Sunday, December 5, 2010

Hook Roll Picture Tutorial

What's this? A sewing tutorial on The Left Side of Crochet?? Has she lost her mind?? Well not entirely, especially considering it is still crochet related!

I recently made a couple of hook rolls as gifts and thought I'd share with you here how I made them. Keep in mind I am NOT an expert sewer, so if I make a mistake or two I hope you'll forgive me. :)

SUPPLIES
You will need:
  • 1/3 yard each of 3 different coordinating cotton or flannel fabrics, OR 3 fat quarters
  • 1/3 yard of fusible interfacing for lightweight to medium fabrics (Not needed if you are using flannel or another heavy fabric for the public side of your hook case)
  • 2 yards of 3/8 inch satin ribbon
  • All purpose sewing thread in a coordinating color
  • Straight pins
  • Self healing cutting mat
  • See-through quilting ruler, 12 inches or longer
  • Rotary cutter
  • Scissors
  • Sewing machine
  • Ironing board/mat (or an old thick cotton towel)
  • Iron
  • Fray Check or Fabric Glue

CUTTING
Cutting Instructions:

**See How to Use a Rotary Cutter if you have never used a rotary cutter.
(OR you can simply use the scissors and a ruler to measure and cut out your fabric pieces.
)
  • Cut one 12" x 11" square from each piece of fabric for a total of three squares
  • Cut one 12" x 11" square from the piece of interfacing
  • Cut the ribbon to (approximately) 36"

DECISIONS
The Hard Part:

Deciding which fabric you want to use where! Designate which square you want to use for the Public Side, Lining/inside, and Pocket. Of course if you are using the same fabric for all 3 then it won't really matter and you can omit this step. :)


LAYERS

Public/Outer Layer:

Following the manufacturer's instructions, adhere the fusible interfacing (if using) to the wrong side of the fabric that you chose for the public side. (Mine called for using a damp cloth when ironing.)
Inside Hook Pocket:

Fold your pocket fabric in half lengthwise so that it is 5.5" x 12". Lay the lining fabric flat and right side up. Place the folded pocket piece on the lining piece matching the cut edges at the bottom. (The fold of the pocket piece will lie horizontally across the center of the lining fabric.)
Starting 2 inches in from each edge of the layered fabric and using straight pins (or Tailor's Chalk if you've got it... I didn't), mark the fabric at one inch intervals along the bottom edge and the top of the folded edge. You should have 9 pins along each edge. (I used a few extra at the corners just to keep everything in place.)


ASSEMBLY

The Good Part:
(Yay, we finally get to sew!)

Starting 2 inches from the edge and using the pins/marks as a guide, sew nine evenly spaced vertical lines across the bottom half of the fabric. Be sure to do a few back-stitches at the top (folded edge) of each line to lock the stitches and keep them from raveling.

Fold the ribbon in half and pin the folded end (with cut ends facing toward the center of the fabric) approximately 4 inches up from the bottom edge of the pocket fabric. Curl the ends around and pin to the center so they don't get caught in the stitching on the next step.
Matching long and short edges, place the pocket piece and the public/outer piece right sides together. Pin the pieces on all sides for sewing. (I was lazy and only pinned the corners.)
Starting at the bottom edge using a 1/2" seam allowance and leaving a 4 inch opening for turning, sew around all sides of the hook roll. Snip corners at an angle to within a scant 1/4" of the seam.


TURNING
We're Getting Close:

Turn the piece right side out. Using the tip of a (what else?) crochet hook, push out the corners from the inside so they are square and neat.

At the opening for turning, fold the seam allowance to the inside and press with iron. Press entire piece with iron to help all seams lay flat.

Dab a little Fray Check on the ends of the ribbon to keep them from fraying.


FINISHING

Top-stitching:

Working approximately 1/4" from edge of fabric, top-stitch around all sides of piece being sure to enclose the raw edges from the opening for turning.


Only Thing Left:

Is to Fill'er Up!

Fold down the top flap.

Roll it up, tie a pretty bow, and...

Ta-DAH!

Enjoy your new Hook Roll!

I hope you enjoyed this tutorial. I had a lot of fun making it. But don't worry, I haven't given up crochet! It's still my number one passion. :)


Tutorial written and photographed by April Moreland
© 2010 All rights reserved.
Please print and/or share this tutorial with your friends, but be sure to include the original link so that they (or you) will be able to find it again. :)

Saturday, December 4, 2010

Dressed for the Season

Happy December!

With the new season here I decided to change the background to match our weather here on the lake. It is cold and snowy and a bit icy today. Yuck! BUT, it is warm and cozy inside so that makes it perfect weather for staying home and doing lots of winter crocheting and crafting.

I have many things on my hook right now which I will be revealing to you over the next couple of weeks as they are received. (Don't want to spoil any surprises!)

And speaking of surprises, I have an unexpected one for you coming up in just a bit. I'll be putting the finishing touches on a brand new tutorial for you all and, if all goes well, will have it posted for you by tomorrow morning!

Hope you all are staying warm and enjoying the season with some crafty pleasures! :)

Thursday, November 25, 2010

Thank You

I just wanted to pop in and wish everyone a Happy Thanksgiving! As I've said before, this is my favorite time of year. For me, as I'm sure many of you, it evokes heart warming memories of family and friends who have touched us through the years, and reminds me of what is good in my life.

You, my friends, are special to me. You give me purpose to do what I love. Crochet! In appreciation for being there for me, I am sharing some special Thanksgiving dessert with you.


Enjoy!!

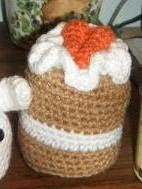
Carrot Cake

*Pattern has been clarified. If you find any other mistakes, please let me know. :)

Materials: (US) size F hook, worsted weight yarn: less than 1 ounce each of Warm Brown, and Soft White; scrap amounts of Carrot, and (optional)Paddy Green (Red Heart Super Saver was used for example), large handful of fiberfil stuffing, 2 small pieces of cardboard or plastic (I used circles cut from a plastic milk jug), tapestry needle.

NOTE: Entire piece is worked in the round without joining unless otherwise noted.

TOP

With Warm Brown and using adjustable loop

Round 1: 6 sc into loop. (6 sc)

Round 2: 2 sc in each st around. (12 sc)

Round 3: (2 sc in next st, sc in next st) 6 times. (18 sc)

Round 4: (2 sc in next st, sc in each of next 2 sts) 6 times. (24 sc)

Round 5: (2 sc in next st, sc in each of next 3 sts) 6 times. (30 sc)

Round 6: (2 sc in next st, sc in each of next 4 sts) 6 times. (36 sc)

Round 7: sc in each st around, sl st in next st to join, fasten off leaving long tail for sewing.

CAKE

With Warm Brown and using adjustable loop

Round 1: 6 sc into loop. (6 sc)

Round 2: 2 sc in each st around. (12 sc)

Round 3: (2 sc in next st, sc in next st) 6 times. (18 sc)

Round 4: (2 sc in next st, sc in each of next 2 sts) 6 times. (24 sc)

Round 5: (2 sc in next st, sc in each of next 3 sts) 6 times. (30 sc)

Round 6: (2 sc in next st, sc in each of next 4 sts) 6 times. (36 sc)

Round 7: sc in each st around.

Round 8: working in BLO, sc in each st around.

Rounds 9-11: sc in each st around.

Round 12: change to Soft White, sc in each st around.

Rounds 13 and 14: sc in each st around.

Round 15: Change to Warm Brown, sc in each st around.

Rounds 16 - 18: sc in each st around, at end of round 18 sl st in next st to join, fasten off, weave in ends.

ICING

With Soft White and using adjustable loop

Round 1: 6 sc into loop. (6 sc)

Round 2: 2 sc in each st around. (12 sc)

Round 3: (2 sc in next st, sc in next st) 6 times. (18 sc)

Round 4: (2 sc in next st, sc in each of next 2 sts) 6 times. (24 sc)

Round 5: (2 sc in next st, sc in each of next 3 sts) 6 times. (30 sc)

Round 6: 3 sc in each st around, sl st in next st to join, fasten off, weave in ends.

CARROTS (make 2)

With Carrot and using adjustable loop

Round 1: 8 sc into adjustable loop. (8 sc)

Round 2: sc in each st around.

Round 3: sc in each of next 6 sts, sc2tog. (7 sc)

Round 4: sc in each of next 5 sts, sc2tog. (6 sc)

Round 5: sc in each of next 4 sts, sc2tog. (5 sc)

Round 6: sc in each of next 3 sts, sc2tog. (4 sc)

Round 7: sc2tog, sc in next st, leave last st unworked, do not join, ch 1 and pull tight, fasten off leaving long tail for sewing. (2 sc)

ASSEMBLY

1) Optional: For tops of CARROTS, cut two 4 inch pieces of Paddy Green. Fold each piece in half and using a lark's head knot (fringe knot), attach 1 strand to each CARROT. Trim to desired length. Using tip of tapestry needle, split the plies of yarn to fray.

2) Arrange CARROTS as desired on top of ICING and using long tail, sew into place.

3) With Soft White, sew ICING piece to TOP piece between rounds 5 and 6.

4) Using the TOP piece as a template, cut 2 circles from the cardboard (or plastic) to fit just inside the CAKE piece. Place one of the circles in the bottom of the CAKE piece. Stuff with fiberfill. Place other circle on top of fiberfil.

5) Using the long tail left at the end of round 7, sew the outer edge of the TOP piece to the top edge of the CAKE piece.

Enjoy!

Sunday, November 21, 2010

DJ Ben Rock Is In Da House!


Anyone with a toddler running around should recognize this bright orange fellow from Nick Jr's Yo Gabba Gabba. Yes, Halloween has been over for 3 weeks, but I still wanted to post a picture of Ben's costume. Well, the hat to be exact.

The hat that came with the DJ Lance Rock costume didn't fit at all, not to mention is was a bit cheesy. So armed with a J Hook, a skein of RHSS in Pumpkin, and a ball of Orange Yarn Bee Haute Fur, I embarked on the mission of creating a proper fitting, and cooler looking, hat. I think I succeeded. :)


Stay tuned for the pattern in an upcoming blog post!

Wednesday, November 17, 2010

Apple Trivet


Finished size: Approximately 9 x 7 inches

Materials: (US) size G hook, Worsted Weight Cotton: 2 oz main color, scraps of green, and brown. (Example was made using Sugar‘n Cream in Red and Dk Pine, and I Love This Cotton in Brown), tapestry needle

Weave in ends as work progresses.

APPLE (make 2)

ch 6, join with sl st to form loop

Row 1: (ch 3, 2 dc, ch 1, 3 dc, ch 2, 3 dc, ch 1, 3 dc) in loop, turn.

Row 2: sl st in each of next 2 sts, sl st into next ch-1 sp, (ch 3, 2 dc, ch 1, 3 dc) in same sp, 6 dc in next ch-2 sp, (3 dc, ch 1, 3 dc) in next ch-1 sp, turn.

Row 3: sl st in each of next 2 sts, sl st into next ch-1 sp, (ch 3, 2 dc, ch 1, 3 dc) in same sp, ch 1, skip next 3 dc, 2 dc in each of next 6 sts, ch 1, (3 dc, ch 1, 3 dc) in next ch-1 sp, turn.

Row 4: sl st in each of next 2 sts, sl st into next ch-1 sp, (ch 3, 2 dc, ch 1, 3 dc) in same sp, ch 1, skip next 3 sts, (sc, ch 2) in each of next 11 sts, (sc, ch 1) in next st, (3 dc, ch 1, 3 dc) in next ch-1 sp, turn.

Row 5: sl st in each of next 2 sts, sl st into next ch-1 sp, (ch 3, 2 dc, ch 1, 3 dc) in same sp, ch 1, skip next 3 sts, (sc, ch 2) in each of next 10 ch-2 sps, (sc, ch 1) in next ch-2 sp, (3 dc, ch 1, 3 dc) in next ch-1 sp, turn.

Row 6: sl st in each of next 2 sts, sl st into next ch-1 sp, (ch 3, 2 dc, ch 1, 3 dc) in same sp, ch 1, skip next 3 sts, (sc, ch 2) in each of next 9 ch-2 sps, (sc, ch 1) in next ch-2 sp, (3 dc, ch 1, 3 dc) in next ch-1 sp, turn.

Row 7: sl st in each of next 2 sts, sl st into next ch-1 sp, (ch 3, 2 dc, ch 1, 3 dc) in same sp, ch 1, skip next 3 sts, (sc, ch 2) in each of next 8 ch-2 sps, (sc, ch 1) in next ch-2 sp, (3 dc, ch 1, 3 dc) in next ch-1 sp, turn.

Row 8: sl st in each of next 2 sts, sl st into next ch-1 sp, (ch 3, 2 dc, ch 1, 3 dc) in same sp, ch 1, skip next 3 sts, (sc, ch 2) in each of next 7 ch-2 sps, (sc, ch 1) in next ch-2 sp, (3 dc, ch 1, 3 dc) in next ch-1 sp, turn.

Row 9: sl st in each of next 2 sts, sl st into next ch-1 sp, (ch 3, 2 dc, ch 1, 3 dc) in same sp, ch 1, skip next 3 sts, (sc, ch 2) in each of next 6 ch-2 sps, (sc, ch 1) in next ch-2 sp, (3 dc, ch 1, 3 dc) in next ch-1 sp, turn.

Row 10: sl st in each of next 2 sts, sl st into next ch-1 sp, (ch 3, 2 dc, ch 1, 3 dc) in same sp, ch 1, skip next 3 sts, (sc, ch 2) in each of next 5 ch-2 sps, (sc, ch 1) in next ch-2 sp, (3 dc, ch 1, 3 dc) in next ch-1 sp, turn.

Row 11: sl st in each of next 2 sts, sl st into next ch-1 sp, (ch 3, 2 dc, ch 1, 3 dc) in same , ch 1, skip next 3 sts, (sc, ch 2) in each of next 4 ch-2 sps, (sc, ch 1) in next ch-2 sp, (3 dc, ch 1, 3 dc) in next ch-1 sp, turn.

Row 12: sl st in each of next 2 sts, sl st into next ch-1 sp, (ch 3, 2 dc, ch 1, 3 dc) in same ch sp, ch 1, skip next 3 sts, (sc, ch 2) in each of next 3 ch-2 sps, (sc, ch 1) in next ch-2 sp, (3 dc, ch 1, 3 dc) in next ch-1 sp, turn.

Row 13: sl st in each of next 2 sts, sl st into next ch-1 sp, (ch 3, 2 dc, ch 1, 3 dc) in same sp, ch 1, skip next 3 sts, (sc, ch 2) in each of next 2 ch-2 sps, (sc, ch 1) in next ch-2 sp, (3 dc, ch 1, 3 dc) in next ch-1 sp, turn.

Row 14: sl st in each of next 2 sts, sl st into next ch-1 sp, (ch 3, 2 dc, ch 1, 3 dc) in same ch sp, ch 1, skip next 3 sts, (sc, ch 2) in next ch-2 sp, (sc, ch 1) in next ch-2 sp, (3 dc, ch 1, 3 dc) in next ch-1 sp, turn.

Row 15: sl st in each of next 2 sts, sl st into next ch-1 sp, (ch 3, 2 dc, ch 1, 3 dc) in same sp, dc in next ch-2 sp, (3 dc, sl st in ch 1 sp of beg shell to join bottom, 3 dc) in next ch-1 sp, fasten off.

LEAVES (make 2)

ch 9

Row 1: sl st in 2nd ch from hook, hdc in next ch, dc in each of next 5 ch, (hdc, ch 1, sl st) in next ch, (working along opposite side of starting ch (ch 1, hdc) in first ch, dc in each of next 5 ch, hdc in next ch, sl st in next ch, fasten off.

STEM (hanging loop)

ch 8, join with sl st to form loop

Round 1: 12 sc in loop, fasten off.


ASSEMBLY

1. Using red yarn and holding the 2 apple pieces wrong sides together, sew around the outer edge to join.

2. Arrange leaves on front of trivet as desired (see photo for example) and sew into place one at a time using green yarn.

3. Sew stem/hanging loop into place at top of trivet (see photo for example) using red or brown yarn.

Ribbed Washcloth


Finished size: 7" Square

Materials:
(US) size 7 needles, 2 ounces Worsted Weight Cotton in desired color (Example was made using I Love This Cotton in the Carousel colorway)

Cast on 35.

Row 1: k3, (p1, k3) across. (35 sts)
Row 2: k1, (p1, k3) across to last 2 sts, p1, k1.
Rows 3 - 35: rep rows 1 and 2 ending with a row 1 rep.
Row 36: Bind off in pattern as established in row 2.

Finish off. Weave in ends. Block to 7" square.


Pattern designed and written by April Moreland
© 2010 All rights reserved