Thursday, March 7, 2013

Pineapples, not just for doilies...

I think most yarnies have a favorite stitch pattern. One that they love if for no other reason than it just looks pretty. For me it's the pineapple stitch. I know there are a lot of people who dislike them. They seem to have fallen into the same outdated realm as the granny square. Perhaps that's because too many people think of their grandma's old fashioned doilies when they hear "pineapple stitch."

But with the availability of fresh new yarns in vibrant colors, grannies have become trendy once again. And so I hope will be the case with pineapples. With talented designers such as Doris Chan using them in their awesome creations, they're once again earning their due.

To see some of my projects using the pineapple stitch visit my project page on Ravelry.

I've also used pineapples in a couple of my designs:


I definitely have more pineapple plans for the future, some of which will be original designs.

Out of curiosity, on which side of the pineapple fence do you sit?


Thank you Melani for inspiring this post!

Wednesday, March 6, 2013

New Phone and a WIP


The kids insisted demanded I need a smartphone. Although I like my old one just fine, my "dinosaur" wasn't up to their standards. I avoided it for a long time. I guess in my old age I've become resistant to change. But I finally gave in to the pressure last week. My new phone arrived yesterday. I've spent far too many hours playing with it and learning to use it, but I must say it's kind of fun to play with the new (to me) features.

My old phone did have a camera, but not quite as good as this one. Above is a sneak peak of my current WIP and upcoming new pattern. Picture taken with my new Kyocera Rise.

Tuesday, March 5, 2013

The Dreaded Project

When I first started this post I was going to share my favorite FO. While looking through my Ravelry Notebook I realized I couldn't narrow it down to just one thing. I love so many of them for different reasons. The colorful granny 'ghans, the cute amigurumi, the pretty bags, the lacy doilies... the list goes on.

But then I came across this. "The 4 Year Afghan". Started Dec 15, 2008, finished Dec 5, 2012. 10 days shy of 4 years. I'm almost certain that's the longest it's taken me to finish a project.


The colors aren't so bad. Not my favorite, but they are Damian's (the recipient) favorite so I went with them. The pattern, I usually like ripples, and this one looked nice, nicely written, not too masculine, not to feminine, so again, I went with it. Everything seemed right, so why did it take so long to finish?


I think it was the softer, rounded points.The ripples I'd done in the past had a more defined point. It was clear where the peaks and valleys were. With this one it was literally row after row of nothing but increases and decreases. I had to constantly count and keep track of where I was in the pattern repeat. Definitely not a mindless project!


Would I ever make the pattern again? I think the pattern would lend itself very well to a baby blanket, so yes, I think I might, but at another time and definitely in a smaller size.

So my question for you is, what is the longest it ever took you to finish a project?

Monday, March 4, 2013

Bunny Egg Cover

Bunny Egg Cover free pattern available for download on Ravelry. Enjoy! :)


Sunday, March 3, 2013

Marshmallow Bunnies

I've been trying to hang a themed wreath on my front door each month. While looking for ideas for this month's wreath on Pinterest I came across this Bunny Peep Wreath from Stampin' Mama and fell in love. Not wanting to hang all that sugar on my door, I immediately thought of the Marshmallow Bunnies pattern from the talented Doni Speigle. Aren't they just too cute not to crochet?


I'll be using Perfect Pink and Lemon RHSS and a G hook. :) I have a small grapevine wreath I picked up at the dollar store. I think it's around 12". I'm not sure how many bunnies I'll need yet, but I think I'll start with 10 and go from there.

One side done... 19 to go. :)


Saturday, March 2, 2013

Free Pattern Downloads

Just wanted to say I'm still crocheting and designing and have two new free patterns on the way later this month, so stay tuned crocheters! Also, please read below and comment with your thoughts and opinions regarding pattern downloads. :)

I've been mixing things up a little bit lately with some knitting projects. I'd wanted a knitted hanging towel for a while but never found the "right" pattern. I decided to sit down one day and "just do it." I liked the result so much I decided to share the pattern as a free download on Ravelry.


A question for everyone: In which format do you prefer your patterns? 

When I first started sharing my free patterns I never thought it would go any further than just a few dishcloths and squares. But with over 75 patterns currently to my credit (and more on the way, I promise!), I've been thinking about reorganizing and streamlining the way in which I deliver them to you. With the popularity of Ravelry, and the ease of creating PDF's, I am considering offering them all as individual PDF downloads. The free ones will remain free, and you will be able to download them directly on the blog from a dedicated page. Or, if you prefer, you can add them to your Ravelry library so they will always be available to you, even if the blog is down for some reason.

ETA: Just to clarify, the PDFs would be for all of the patterns that are currently here on the blog as well as any future patterns that I offer. Also, they would only be available as a PDF. They would no longer be here as a web page.


Friday, March 1, 2013

Kicking off National Crochet Month

"Crocheted Room" 
origin unknown

It's been nearly a year since I moved out of my daughter's house into my own apartment. It had been a while since I lived in my own place. I have to admit it's quite nice to finally feel "at home" again. I've spent the past several years bouncing between family members' homes. In these types of situations space is always a commodity, so out of necessity (and keeping peace) I've given away, donated, or otherwise disposed of a lot of my old furniture and decorative items.

With all of my moving and shuffling things around, I did hold firm on keeping the necessities such as kitchen items, bath supplies, bed linens, etc., knowing someday I would have my own place again. I also managed, through it all, to hold on to the majority of my yarn and crafting stash. I'm still amazed I actually managed to pull that one off. There were times I was sure the family had had enough of constantly bumping into and tripping over my storage totes!

But we muddled through somehow and now I'm back to looking at a blank canvas. So with almost no budget, but with a closet full to the brim with crafty "stuff", I'm taking on the task of beautifying my new home with yarn, thread, and any other fun supplies I happen to have on hand. The rules are simple. Well, not rules really, more like arbitrary guidelines...
  1. Reduce, reuse, recycle.
  2. Spend little or no money.
  3. Enjoy the process.
I'm not entirely sure where I'm headed with this project. I have a few ideas, small projects here and there--maybe a few larger ones as well (think filet tablecloth and maybe even mural??)--little bits of colorful and creative accessories to liven up the bland ecru walls. It will be a relatively slow process. Never-ending really. Continually growing and evolving. And I'm inviting you all along for the ride!

I've started a Flickr group so we can share our creativity and inspire others to enhance their living spaces as well. So come show us how you have used crochet or other DIY projects to decorate your home?

Sunday, June 3, 2012

Did you know?

As you already know, I love to design original crochet patterns and I've shared many of those designs with you over the past several years. I've so enjoyed seeing the projects you've created with them and how you personalize those patterns with your own ingenuity and color sense.

I will always continue to offer free patterns for all to enjoy, but lately I have ventured into the realm of Self Publishing. I currently have three patterns offered in my Ravelry store (see below) and am working on plans for many more in the near future. Future patterns include some fun and quirky kitchen items, some adorable little amigumi, a mile a minute design, and a light and airy wrap called "Ocean Breezes."

These are my current designs for sale. I hope you like them as much as I enjoyed designing them!

Tic Tac Tote
This bag is sized just right for everyday use. Fill it with your daily essentials for a stylish purse, or add your latest WIP for grab-n-go convenience. Pattern includes both a handle option and a strap option for your carrying preference. 
*Finished size is 15 x 12.5 inches, (not including straps).
 
$3.50


Li'l Punkin Bear
No one will be able to resist this little cutie! Li'l Punkin Bear is all dressed up and ready to bring fun to your fall decor and festivities. Make several to use as place markers at the holiday table, to give guests as favors, or just to brighten someone's day.
*Li'l Punkin Bear is 4 inches tall.
$3.00


Bagels with Lox and Cream Cheese
Whip up a few to display as part of a whimsical tablescape, or make some for the kids to serve up in the play kitchen. Either way, this breakfast staple is sure to be a hit with everyone! 
*Finished size for the Bagel is 3.75 inches diameter. 
*Finished size for the Lox is 2.75 x 1.5 inches.
$3.00


Friday, May 18, 2012

CAL Patterns Added

Just a quick note to let you know that I have added 2 new patterns to the Charity CAL. Hope You enjoy!


12" Sailing Along

6" Sailing Along
12" Orange Blossom
6" Orange Blossom


Wednesday, May 16, 2012

She's Ba-ack

Wow, it's been a long time since I posted. I don't have much to say other than things are starting to look a little brighter for me. I recently bought myself a new computer to replace the one that died early last fall in what I call "the great carpet cleaning fiasco of 2011." I can joke about it now only because no data was actually lost. All of my patterns were safely backed up, plus the hard drive itself was not damaged. Phew! I have to admit though, it was pretty hard living without a computer for all those months!!

You may have noticed I just posted a couple of new free patterns. First is a washcloth that I made using "I Love This Cotton," hence the name "I Love This Washcloth".


And next is a pear shaped hotpad/trivet. The Pear Trivet is very similar to the Apple Trivet I posted in 2010. In fact they are almost identical. I changed the last row to make it a little more flat to give the pear the right shape. You could also use this for the apple to give it a flatter bottom. I also changed the leaf a little bit for the pear.

Pear Trivet
Pear Trivet as an apple
I do have some more free designs coming up soon, including the final installments for the Charity 'gahn CAL, as well as some new patterns for my Ravelry Shop. Everything is worked up, just need to write them up and test them!

Stay Tuned!

Pear Trivet


Finished size: Approximately 9 x 7 inches

Materials: (US) size G hook, Worsted Weight Cotton: 2 oz main color, 2 yards brown. (Example was made using Sugar‘n Cream in Country Green and Warm Brown), tapestry needle

NOTE: Row 3 is now corrected. It was missing the "ch 1" before the last shell. Thank you Micheline for catching that error!

Weave in ends as work progresses

PEAR (make 2)

ch 6, join with sl st to form loop

Row 1: (ch 3, 2 dc, ch 1, 3 dc, ch 2, 3 dc, ch 1, 3 dc) in loop, turn.

Row 2: sl st in each of next 2 sts, sl st into next ch-1 sp, (ch 3, 2 dc, ch 1, 3 dc) in same sp, 6 dc in next ch-2 sp, (3 dc, ch 1, 3 dc) in next ch-1 sp, turn.

Row 3: sl st in each of next 2 sts, sl st into next ch-1 sp, (ch 3, 2 dc, ch 1, 3 dc) in same sp, ch 1, skip next 3 dc, 2 dc in each of next 6 sts, ch 1, (3 dc, ch 1, 3 dc) in next ch-1 sp, turn.

Row 4: sl st in each of next 2 sts, sl st into next ch-1 sp, (ch 3, 2 dc, ch 1, 3 dc) in same sp, ch 1, skip next 3 sts, (sc, ch 2) in each of next 11 sts, (sc, ch 1) in next st, (3 dc, ch 1, 3 dc) in next ch-1 sp, turn.

Row 5: sl st in each of next 2 sts, sl st into next ch-1 sp, (ch 3, 2 dc, ch 1, 3 dc) in same sp, ch 1, skip next 3 sts, (sc, ch 2) in each of next 10 ch-2 sps, (sc, ch 1) in next ch-2 sp, (3 dc, ch 1, 3 dc) in next ch-1 sp, turn.

Row 6: sl st in each of next 2 sts, sl st into next ch-1 sp, (ch 3, 2 dc, ch 1, 3 dc) in same sp, ch 1, skip next 3 sts, (sc, ch 2) in each of next 9 ch-2 sps, (sc, ch 1) in next ch-2 sp, (3 dc, ch 1, 3 dc) in next ch-1 sp, turn.

Row 7: sl st in each of next 2 sts, sl st into next ch-1 sp, (ch 3, 2 dc, ch 1, 3 dc) in same sp, ch 1, skip next 3 sts, (sc, ch 2) in each of next 8 ch-2 sps, (sc, ch 1) in next ch-2 sp, (3 dc, ch 1, 3 dc) in next ch-1 sp, turn.

Row 8: sl st in each of next 2 sts, sl st into next ch-1 sp, (ch 3, 2 dc, ch 1, 3 dc) in same sp, ch 1, skip next 3 sts, (sc, ch 2) in each of next 7 ch-2 sps, (sc, ch 1) in next ch-2 sp, (3 dc, ch 1, 3 dc) in next ch-1 sp, turn.

Row 9: sl st in each of next 2 sts, sl st into next ch-1 sp, (ch 3, 2 dc, ch 1, 3 dc) in same sp, ch 1, skip next 3 sts, (sc, ch 2) in each of next 6 ch-2 sps, (sc, ch 1) in next ch-2 sp, (3 dc, ch 1, 3 dc) in next ch-1 sp, turn.

Row 10: sl st in each of next 2 sts, sl st into next ch-1 sp, (ch 3, 2 dc, ch 1, 3 dc) in same sp, ch 1, skip next 3 sts, (sc, ch 2) in each of next 5 ch-2 sps, (sc, ch 1) in next ch-2 sp, (3 dc, ch 1, 3 dc) in next ch-1 sp, turn.

Row 11: sl st in each of next 2 sts, sl st into next ch-1 sp, (ch 3, 2 dc, ch 1, 3 dc) in same , ch 1, skip next 3 sts, (sc, ch 2) in each of next 4 ch-2 sps, (sc, ch 1) in next ch-2 sp, (3 dc, ch 1, 3 dc) in next ch-1 sp, turn.

Row 12: sl st in each of next 2 sts, sl st into next ch-1 sp, (ch 3, 2 dc, ch 1, 3 dc) in same ch sp, ch 1, skip next 3 sts, (sc, ch 2) in each of next 3 ch-2 sps, (sc, ch 1) in next ch-2 sp, (3 dc, ch 1, 3 dc) in next ch-1 sp, turn.

Row 13: sl st in each of next 2 sts, sl st into next ch-1 sp, (ch 3, 2 dc, ch 1, 3 dc) in same sp, ch 1, skip next 3 sts, (sc, ch 2) in each of next 2 ch-2 sps, (sc, ch 1) in next ch-2 sp, (3 dc, ch 1, 3 dc) in next ch-1 sp, turn.

Row 14: sl st in each of next 2 sts, sl st into next ch-1 sp, (ch 3, 2 dc, ch 1, 3 dc) in same ch sp, ch 1, skip next 3 sts, (sc, ch 2) in next ch-2 sp, (sc, ch 1) in next ch-2 sp, (3 dc, ch 1, 3 dc) in next ch-1 sp, turn.

Row 15: sl st in each of next 2 sts, sl st into next ch-1 sp, (ch 3, 2 dc) in same sp, dc in 
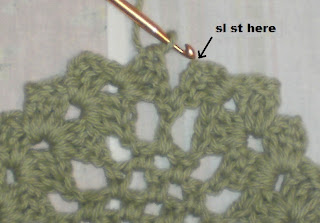
next ch-2 sp, 3 dc in next ch-1 sp, turn, sl st in 3rd ch of beg ch 3 (see photos below), fasten off.

Left Handed (click for close up view)
Right Handed (click for close up view)

 LEAF

leaving 10-12 inch tail for sewing, ch 9

Row 1: sl st in 2nd ch from hook, sc in next ch, hdc in next ch, dc in each of next 3 ch, hdc in next ch, ch 1, sl st in next ch, ch 1, (working along opposite side of starting ch) hdc in next ch, dc in each of next 3 ch, hdc in next ch, sc in next ch, sl st in next ch, fasten off.

STEM (hanging loop)

ch 8, join with sl st to form loop

Round 1: ch 1, 12 sc in loop, fasten off leaving 10-12 inch tail for sewing.


ASSEMBLY

1. Using green yarn and holding the 2 pear pieces wrong sides together, sew around the outer edge to join.

2. Using long tail, sew stem/hanging loop into place at top of trivet (see photo for example).

3. Using long tail, sew leaf to side of stem as desired (see photo for example).

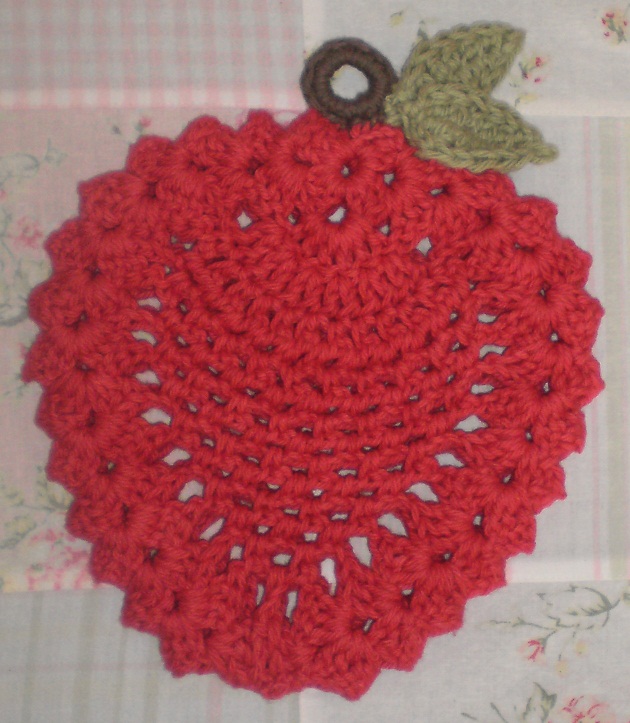
Turn it around and you have an Apple! :)
 Pattern designed and written by April Moreland
© 2012 All rights reserved

I Love This Washcloth


Finished size: Approximately 7 x 7 inches

Materials: (US) size I hook, 3 ounces I Love This Cotton* (available from Hobby Lobby), tapestry needle

*Colors shown above, from left to right: Carousel Ombre, Amethyst, Buttercup, Aqua
*One skein will make 2 cloths

NOTES
ch 1 does not count as a stitch at beginning of row
ch 3 counts as dc at the beginning of row
Weave in ends as work progresses

ch 22 loosely

Row 1: sc in 2nd ch from hook, [dc in next ch, sc in next ch] 10 times, ch 3, turn. (21 sts)

Row 2: [sc in next st, dc in next st] 10 times, ch 1, turn. (21 sts)

Row 3: sc in same st, [dc in next st, sc in next st] 10 times, ch 3, turn. (21 sts)

Rows 4 - 17: Repeat rows 2 - 3 seven times (ending row 17 with ch 1, turn) for a total of 17 rows. Do not fasten off.


Border:

Round 1: 3 sc in same st, sc in each of next 19 sts, 3 sc in next st, *working in ends of rows- evenly space 19 sc along side**, working along opposite side of starting chain- 3 sc in first st, sc in each of next 19 sts, 3 sc in next st, repeat between * and **, join with sl st in beg sc. (88 sc)

Round 2: ch 1, (sc, ch 1, dc) in same st, skip next st, [(sc, ch 1, dc) in next st, skip next st] 43 times, join with sl st in beg sc, fasten off. (44 scallops)


 Pattern designed and written by April Moreland
© 2012 All rights reserved

Tuesday, August 23, 2011

Exciting News and a Sneak Preview!!

I am just beside myself with excitement. I've been sitting on pins and needles for several months now wanting desperately to spill the beans. It was very hard, but I was a good girl and kept quiet. And now the time is here, I can finally say it out loud...

I'm going to be Published!!

Yes, published! My first professional pattern in a real honest to goodness, buy it at your local news-stand, popular crochet magazine. The October 2011 issue of Crochet World magazine to be exact.

Here's the sneak preview on Ravelry of what you will see in the magazine:
http://www.ravelry.com/patterns/sources/crochet-world-magazine-october-2011/patterns

I can't believe my afghan was chosen for the front cover! It truly is an honor!

Thursday, June 16, 2011

Orange Blossom


Finished Size: 6 or 12 inches

Materials: Worsted Weight Yarn: approximately 2 ounces in each color A, and color B; US size "H" hook; tapestry needle for weaving in ends.

12 inch example (shown above): Pattern was worked using Red Heart Super Saver in Aruba Sea for color A, and Red Heart Super Saver in Real Teal for color B.

6 inch example (shown below): Pattern was worked using Red Heart Super Saver in Real Teal for color A, and Red Heart Super Saver in White for color B. (*See note below for instructions for 6 inch square.)


With color A ch 4, sl st in 4th ch from hook to form loop

Round 1: ch 3, 15 dc in loop, join with sl st in top of beg ch 3. (16 dc)

Round 2: Working in BLO: ch 3, dc in same st, 2 dc in each st around, join with sl st in top of beg ch 3. (32 dc)

Round 3: Working in BLO: ch 3, dc in same st, dc in next st, (2 dc in next st, dc in next st) around, sl st in top of next beg ch 3 to join, fasten off. (48 dc,)

Round 4: Working in unworked FLO from Rounds 2 and 3: join color A with sc in first st of rnd 2, ch 2, sc in 3rd st of rnd 3, ch 2, (skip next st on rnd 2, sc in next st, ch 2, skip next 3 sts of rnd 3, sc in next st, ch 2) around, join with sl st in beg sc. (8 "petals")

Round 5: Join color B with sl st in top of beg ch on round 3, ch 3, [(2 dc, ch 2, 2 dc) in next st, dc in each of next 3 sts, hdc in next st, sc in each of next 3 sts, hdc in next st, dc in each of next 3 sts] 3 times, (2 dc, ch 2, 2 dc) in next st, dc in each of next 3 sts, hdc in next st, sc in each of next 3 sts, hdc in next st, dc in each of next 2 sts, join with sl st in top of beg ch 3, fasten off. (40 dc, 12 sc)

Round 6: ch 3, dc in each of next 2 sts, [(2 dc, ch 2, 2 dc) in next ch sp, dc in each st across to next ch sp] 3 times, (2 dc, ch 2, 2 dc) in next ch sp, dc in each rem st across, join with sl st in top of beg ch 3, fasten off. (76 dc)

Round 7: Join color A with sl st in any ch 2 sp, ch 1, 3 sc in same ch sp, sc in each st across to next ch 2 sp, (3 sc in next ch sp, sc in each st across to next ch 2 sp) 3 times, join with sl st in top of beg sc, fasten off.

Round 8: Join color B with sl st in center st of any corner, ch 3, (dc, ch 2, 2 dc) in same sp, dc in each st across to center st of next corner, [(2 dc, ch 2, 2 dc) in next st, dc in each st across to center st of next corner] 3 times, join with sl st in top of beg ch 3, fasten off.

Rounds 9 - 12: Repeat rounds 7 and 8 twice more. Weave in all ends.


*NOTE: For 6 inch square work as follows:

Rounds 1 - 5: Work same as rounds 1-5 of 12 inch square, fasten off at end of round 5.

Round 6: Work same as round 7 of 12 inch square. Weave in all ends.

Pattern designed and written by April Moreland
© 2011 All rights reserved

Back to main Charity 'Ghan CAL page

Monday, May 16, 2011

Sailing Along


Finished Size: 6 or 12 inches

Materials: Worsted Weight Yarn: approximately 2 ounces in each color A, and color B; US size "H" hook; tapestry needle for weaving in ends.

12 inch example (shown above): Pattern was worked using Red Heart Super Saver in Aruba Sea for color A, and Red Heart Super Saver in Real Teal for color B.

6 inch example (shown below): Pattern was worked using Red Heart Super Saver in Real Teal for color A, and Red Heart Super Saver in White for color B. (*See note below for instructions for 6 inch square.)


With color A ch 4, sl st in 4th ch from hook to form loop

Round 1: ch 3, 15 dc in loop, join with sl st in top of beg ch 3. (16 dc)

Round 2: ch 3, dc in same st, 2 dc in each st around, join with sl st in top of beg ch 3. (32 dc)

Round 3: Working in BLO: ch 3, dc in same st, dc in next st, (2 dc in next st, dc in next st) around, sl st in top of next beg ch 3 to join, fasten off. (48 dc,)

Round 4: Working in unworked FLO from Round 3 join color A with sl st in first st, (ch 3, sl st in 2nd ch from hook, hdc in next ch, skip next st on rnd 3, sl st in next st) around, join with sl st in beg sl st. (16 "waves")

Round 5: Join color B with sl st in top of beg ch on round 3, ch 3, [(2 dc, ch 2, 2 dc) in next st, dc in each of next 3 sts, hdc in next st, sc in each of next 3 sts, hdc in next st, dc in each of next 3 sts] 3 times, (2 dc, ch 2, 2 dc) in next st, dc in each of next 3 sts, hdc in next st, sc in each of next 3 sts, hdc in next st, dc in each of next 2 sts, join with sl st in top of beg ch 3, fasten off. (40 dc, 12 sc)

Round 6: ch 3, dc in each of next 2 sts, [(2 dc, ch 2, 2 dc) in next ch sp, dc in each st across to next ch sp] 3 times, (2 dc, ch 2, 2 dc) in next ch sp, dc in each rem st across, join with sl st in top of beg ch 3, fasten off. (76 dc)

Round 7: Join color A with sl st in any ch 2 sp, ch 1, 3 sc in same ch sp, sc in each st across to next ch 2 sp, (3 sc in next ch sp, sc in each st across to next ch 2 sp) 3 times, join with sl st in top of beg sc, fasten off.

Round 8: Join color B with sl st in center st of any corner, ch 3, (dc, ch 2, 2 dc) in same sp, dc in each st across to center st of next corner, [(2 dc, ch 2, 2 dc) in next st, dc in each st across to center st of next corner] 3 times, join with sl st in top of beg ch 3, fasten off.

Rounds 9 - 12: Repeat rounds 7 and 8 twice more. Weave in all ends.


*NOTE: For 6 inch square work as follows:

Rounds 1 - 5: Work same as rounds 1-5 of 12 inch square, fasten off at end of round 5.

Round 6: Work same as round 7 of 12 inch square. Weave in all ends.


Pattern designed and written by April Moreland
© 2011 All rights reserved

Back to main Charity 'Ghan CAL page

Wednesday, May 4, 2011

S P R I N G

Our first real sign of Spring showed up in the front yard several days ago. In amongst the rose bushes and uncollected leaves from last fall is one single lonely, but gorgeous, tulip. This is our first spring here so we are left wondering why only one. Did the previous owner see fit to plant just one bulb, or is this the lone survivor of all those harsh winters? Either way it is good to have concrete proof that spring is finally here!


Below is a flowering tree from the back yard. I'm not sure what kind it is. Cherry maybe? Another pretty surprise for spring.


And this one, a bush that accents the corner of the front porch, I have not a clue what it might be. I don't think I've ever seen one like it before. Very unique indeed.


And now for some crochet:
I can't show you anything I'm working on at the moment. It's all very Top Secret and Hush Hush, so I thought I'd show you the Flower Fairy and Mushroom that Cyndi surprised me with before Easter. I just love them. :)