Wednesday, March 30, 2011

Knitting & Crochet Blog Week: Day Three


Day Three: 30th March. Tidy mind, tidy stitches.
How do you keep your yarn wrangling organised?

I only pretend to be an organized person. I mentioned my proposed attempt at organization in this post. I did manage to get a few things moved around and even put some yarn away. And I moved some boxes that contained non-crafty items to the basement for storage. But it's still a mess in that room. It's not completely disorganized. There are small bits of order to be found.

My RHSS is organized by color with a separate cubby for variegateds. I've also got 2 cubbies each for ILTY, Simply Soft, and Vanna's Choice.


And I've got my fabric neatly folded and put away on a small bookshelf. I don't do much with fabric these days so it's easy to keep this area in order.


But pull away from that bookshelf and the chaos reveals itself! Boxes, tubs, and baskets of yarn and other craft supplies waiting for a home to call their own.


What it comes down to is do I take the time to organize? Or do I crochet? Duh, we know what that answer is! I do spend small bits of time in my "Yarn Room" in the name of organization but, for the most part, I just go in there to gather supplies and take them elsewhere to work.

The truth is I desperately want a perfectly arranged space to work in. Who doesn't? But my current situation doesn't afford me that luxury. I can see it in my future. It's on the horizon. Eventually I will have that ideal workspace, but for now I'll have to settle for almost.

2kcbwday3

Tuesday, March 29, 2011

Knitting & Crochet Blog Week: Day Two

Day Two: 29th March. Skill + 1UP
Look back over your last year of projects and compare where you are in terms of skill and knowledge of your craft to this time last year. Have you learned any new skills or forms of knitting/crochet (can you crochet cable stitches now where you didn’t even know such things existed last year? Have you recently put a foot in the tiled world of entrelac? Had you even picked up a pair of needles or crochet hook this time last year?


Today's post was a hard one to write. I've been crocheting for 35 years, and while I believe there's always something new to learn, there's just not anything in the past year that I see I'm doing any differently. I haven't learned any new techniques or skills. No new stitches or unusually complicated patterns. I've done both tunisian and single crochet entrelac. I know how to crochet cables (and knit them too.) I've even made a sock! I've never met a pattern I couldn't conquer. From the very beginning I took to knitting and crochet like a duck to water. It all seemed to come naturally to me.

I think the hardest thing I've ever done was teach my daughter how to crochet. As you probably already know I am left-handed. As a lefty I'm used to looking at the world backward. I can look at what a right handed person is doing and reverse it in my mind and know what to do. Imagine learning to crochet with nothing but mirror images where left is right and front is back. I learned at an early age to make this compensation and it has been an invaluable tool to me ever since.

My daughter on the other hand (pun intended) is right handed. For her the world is just as it should be. So looking at me and trying to reverse the images wasn't working. Even when I guided her hand... So what was a mother to do? I sat down, crochet hook in right hand, and started awkwardly crocheting right along with her. We both struggled at first and created some wonky looking stitches. But we made it through and she is now a fabulous crocheter and designer!

As for myself, well I never could get past those beginner wonky stitches and was quite happy that she was able to catch on quickly. I am a proven lefty and always will be.

Knitting on the other hand is a different story...

2kcbwday2

Monday, March 28, 2011

Knitting & Crochet Blog Week: Day One

Day One: 28th March. A Tale of Two Yarns. Part of any fibre enthusiast’s hobby is an appreciation of yarn. Choose two yarns that you have either used, are in your stash or which you yearn after and capture what it is you love or loathe about them.

I just learned about Knitting & Crochet Blog Week a couple of weeks ago so this will be my first year participating. I hope you enjoy my commentary.

I am far from an expert on fibers. My yarn experience has been mostly limited to budget yarns. Worsted weight acrylics bought at the local discount store. I have had occasion to sample some of the "luxury" yarns picked up at my old LYS, but my experience with those are quite limited.

Because of this lack of hands on experience I had a difficult time choosing the 2 yarns to discuss. Should I go with one of the Noro? (Which I absolutely LOVE by the way.) Or maybe the much dreaded (too hard to crochet with and better suited to knitting projects) boucle? Or better yet, assess my stash and choose the two yarns I have the most of and use most often? BINGO!

The two yarns that are predominate in my stash are Red Heart Super Saver, RHSS for short, and I Love This Yarn, also known as ILTY. Both are worsted weight acrylic "budget" yarns. The RHSS is best known for its durability and value, while ILTY can attribute its popularity to its softness.

First up is the well known RHSS. I love it for its durability and affordability. I know a lot of people don't like it, but for me it's the obvious choice since my budget is often limited. I do love that it's available nationwide from Walmart and most other major chain craft stores so availability is rarely a problem. I've heard many people complain about its scratchiness but a quick trip through the washer and dryer will take care of that nicely. But most importantly is its durability.

Below is the throw I made for Cyndi about 7 years ago. It has suffered the usual abuse but is still hanging in there. It's just a regular 5 row granny made with RHSS in black, Plum Pudding, and Banana Berry.


And this is a throw I made for myself around the same time as the above. It's the Traditional Classic Afghan. The pattern originally called for TLC Essentials, but I used RHSS in its place. The afghan has held up exceptionally well through nightly use and multiple washings. It's one of my favorites.


ILTY is the Hobby Lobby store brand of yarn. It costs a little more than Red Heart, and has a tad less yardage, but what it lacks in frugality, it totally makes up for it with softness. Hobby Lobby is not yet a national chain, but they are ever expanding and they do sell from their website http://www.shophobbylobby.com. I wish I could attest to its durability, but the fact is that I've only been working with it for a few years and so far haven't held onto anything that I've made with it long enough to see how it wears. I love to use it for charity items, especially scarves as shown below.


I did recently complete the Regency Square afghan for myself with ILTY in Light Sage. We'll see how it holds up over time, but for now it is very soft and snuggly to cover up with.


Just as a bonus, and for contrast, I thought I'd throw in a commentary about another yarn that is (unfortunately) abundant in my stash. It's is at the opposite end of my "rate-o-meter"... It's Boucle. Doesn't matter which brand it is, it's all hard to work with in my book. I went crazy buying a bunch of it several years ago when I was still building my stash, and those same skeins are still sitting here taunting me. I do like the colors, and I've used a few to make shawls, but for the most part it's a yarn I avoid. It's hard to work with, the little nubs make it hard to form the stitches and nearly impossible to frog. I've had minor success with using a larger hook with it, but it's still not a yarn I look forward to using.

Shawl made with Rainbow Boucle by Sensations from Joann's. Pattern is Silver Shawl from Lion Brand.


2kcbwday1

Wednesday, March 16, 2011

Green Thumb


Finished Size: 6 or 12 inches

Materials: Worsted Weight Yarn: approximately 2 ounces in each color A, and color B; US size "H" hook; tapestry needle for weaving in ends.

12 inch example (shown above): Pattern was worked using Red Heart Super Saver in Spring Green for color A, and Red Heart Super Saver in Paddy Green for color B.

6 inch example (shown below): Pattern was worked using Red Heart Super Saver in Paddy Green for color A, and Red Heart Super Saver in White for color B. (*See note below for instructions for 6 inch square.)


With color A ch 4, sl st in 4th ch from hook to form loop

Round 1: ch 3, 15 dc in loop, join with sl st in top of beg ch 3. (16 dc)

Round 2: ch 3, dc in same st, 2 dc in each st around, join with sl st in top of beg ch 3. (32 dc)

Round 3: Working in BLO: ch 3, dc in same st, dc in next st, (2 dc in next st, dc in next st) around, sl st in top of next beg ch 3 to join, fasten off. (48 dc,)

Round 4: Working in unworked FLO from Round 3 join color A with sl st in first st, (skip next st, 5 dc in next st, skip next st, sl st in next st) around, join with sl st in beg sl st. (40 dc)

Round 5: Join color B with sl st in top of beg ch on round 3, ch 3, [(2 dc, ch 2, 2 dc) in next st, dc in each of next 3 sts, hdc in next st, sc in each of next 3 sts, hdc in next st, dc in each of next 3 sts] 3 times, (2 dc, ch 2, 2 dc) in next st, dc in each of next 3 sts, hdc in next st, sc in each of next 3 sts, hdc in next st, dc in each of next 2 sts, join with sl st in top of beg ch 3, fasten off. (40 dc, 12 sc)

Round 6: ch 3, dc in each of next 2 sts, [(2 dc, ch 2, 2 dc) in next ch sp, dc in each st across to next ch sp] 3 times, (2 dc, ch 2, 2 dc) in next ch sp, dc in each rem st across, join with sl st in top of beg ch 3, fasten off. (76 dc)

Round 7: Join color A with sl st in any ch 2 sp, ch 1, 3 sc in same ch sp, sc in each st across to next ch 2 sp, (3 sc in next ch sp, sc in each st across to next ch 2 sp) 3 times, join with sl st in top of beg sc, fasten off.

Round 8: Join color B with sl st in center st of any corner, ch 3, (dc, ch 2, 2 dc) in same sp, dc in each st across to center st of next corner, [(2 dc, ch 2, 2 dc) in next st, dc in each st across to center st of next corner] 3 times, join with sl st in top of beg ch 3, fasten off.

Rounds 9 - 12: Repeat rounds 7 and 8 twice more. Weave in all ends.


*NOTE: For 6 inch square work as follows:

Rounds 1 - 5: Work same as rounds 1-5 of 12 inch square, fasten off at end of round 5.

Round 6: Work same as round 7 of 12 inch square. Weave in all ends.

Pattern designed and written by April Moreland
© 2011 All rights reserved

Back to main Charity 'Ghan CAL page

Thursday, February 17, 2011

Early Taste of Spring


For the past few months this has been the normal scenery around here. Snow, snow, and more SNOW! The day I took that picture it was still early in the season and not nearly as cold as the temps later dipped. It just kept getting colder and dropping more snow on us. I didn't think we'd ever dig out!

But thanks to my son, and the snow blower, we were able to (barely) keep our heads above the snow. And now, finally, Mother Nature is giving us a hand with the snow & ice removal.


In case you can't see what the thermometer says... it's 50 (FIFTY!) degrees! Sweltering I tell ya! It makes me want to put on my shorts and run outside barefoot. Okay, I know that's a bit extreme, especially with all the ice, snow, and slush that is still out there, but this weather is giving me spring fever.

Sadly, the high temps are not here to stay. It will be below freezing again before the weekend is over. *sigh*

This nice weather, temporary as it may be, makes me hopeful that Spring is just around the corner. So much so that I couldn't resist a quart of strawberries from the grocery store. Being a bit before their season they were a little tart, but some sugar took care of that nicely.

Add some bananas...

and some whipped cream...

and Ben and I had a yummy breakfast!
I will be enjoying the last of our unseasonably warm weather tomorrow by organizing my craft room. It's actually a closed-in porch that acts as a 3 season room. I never really had a chance to get it set up the way I wanted it when we first moved in. I got about halfway finished when it became too cold to work back there.


As you can see I still have my work cut out for me. Lots of boxes and totes full of crafting goodies to find a home for...

I have lots of plans for the space. I will keep you all posted on my progress. Until then, thanks for reading :)

Wednesday, February 16, 2011

Seeing Spots


Finished Size: 6 or 12 inches

Materials: Worsted Weight Yarn: approximately 2 ounces in each color A, and color B; US size "H" hook; tapestry needle for weaving in ends.

12 inch example (shown above): Pattern was worked using Red Heart Super Saver in Pretty 'n Pink for color A, and Red Heart Super Saver in Cherry Red for color B.

6 inch example (shown below): Pattern was worked using Red Heart Super Saver in Cherry Red for color A, and Red Heart Super Saver in White for color B. (*See note below for instructions for 6 inch square.)

NOTE: On round 2 you will be working a dc in the next st and then you will work a FPDC (front post double crochet)around that same st.


With color A ch 4, sl st in 4th ch from hook to form loop

Round 1: ch 3, 15 dc in loop, join with sl st in top of beg ch 3. (16 dc)

Round 2: ch 3, FPDC around beg ch of previous round, (dc, FPDC) in each st around, join with sl st in top of beg ch 3, change to color B. (16 dc, 16 FPDC)

Round 3: ch 4 (counts as beg ch 3 + ch 1), skip next FPDC, (dc in next st, ch 1, skip next FPDC) around, sl st in top of next beg ch 3 to join, fasten off. (16 dc, 16 ch 1 sp)

Round 4: Working around ch spaces of previous row join color A with sl st in any skipped FPDC, ch 2, 2 hdc in same st, skip next st, (3 hdc in next skipped FPDC, skip next st) around, join with sl st in top of beg ch 2, change to color B. (48 hdc)

Round 5: ch 3, [(2 dc, ch 2, 2 dc) in next st, dc in each of next 3 sts, hdc in next st, sc in each of next 3 sts, hdc in next st, dc in each of next 3 sts] 3 times, (2 dc, ch 2, 2 dc) in next st, dc in each of next 3 sts, hdc in next st, sc in each of next 3 sts, hdc in next st, dc in each of next 2 sts, join with sl st in top of beg ch 3, fasten off. (40 dc, 12 sc)

Round 6: ch 3, dc in each of next 2 sts, [(2 dc, ch 2, 2 dc) in next ch sp, dc in each st across to next ch sp] 3 times, (2 dc, ch 2, 2 dc) in next ch sp, dc in each rem st across, join with sl st in top of beg ch 3, fasten off. (76 dc)

Round 7: Join color A with sl st in any ch 2 sp, ch 1, 3 sc in same ch sp, sc in each st across to next ch 2 sp, (3 sc in next ch sp, sc in each st across to next ch 2 sp) 3 times, join with sl st in top of beg sc, fasten off.

Round 8: Join color B with sl st in center st of any corner, ch 3, (dc, ch 2, 2 dc) in same sp, dc in each st across to center st of next corner, [(2 dc, ch 2, 2 dc) in next st, dc in each st across to center st of next corner] 3 times, join with sl st in top of beg ch 3, fasten off.

Rounds 9 - 12: Repeat rounds 7 and 8 twice more. Weave in all ends.


*NOTE: For 6 inch square work as follows:

Rounds 1 - 5: Work same as rounds 1-5 of 12 inch square, fasten off at end of round 5.

Round 6: Work same as round 7 of 12 inch square. Weave in all ends.

Pattern designed and written by April Moreland
© 2011 All rights reserved

Back to main Charity 'Ghan CAL page

Monday, February 14, 2011

Pink Crush

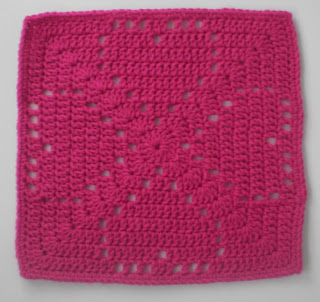
Finished Size: 12 inches

Materials: approximately 3 ounces worsted weight yarn (example was made using Red Heart Super Saver in Shocking Pink); US size "H" hook; tapestry needle for weaving in ends.

ch 5, join with sl st to form loop.

Round 1: ch 3, 15 dc in in loop, join with sl st in top of beg ch 3. (16 dc)

Round 2: ch 3, 4 dc in same st, dc in next st, ch 1, skip next st, dc in next st, *5 dc in next st, dc in next st, ch 1, skip next st, dc in next st, rep from * twice more, join with sl st in top of beg ch 3. (28 dc)

Round 3: sl st in next st, ch 3, 5 dc in next st, dc in next st, ch 1, skip next st, dc in next st, dc in next ch 1 sp, dc in next st, ch 1, skip next st, *dc in next st, 5 dc in next st, dc in next st, ch 1, skip next st, dc in next st, dc in next ch 1 sp, dc in next st, ch 1, skip next st, rep from * twice more, join with sl st in top of beg ch 3. (40 dc)

Round 4: sl st in each of next 2 sts, ch 3, 5 dc in next st, dc in next st, ch 1, skip next st, dc in next st, dc in next ch 1 sp, dc in each of next 3 sts, dc in next ch 1 sp, dc in next st, ch 1, skip next st, *dc in next st, 5 dc in next st, dc in next st, ch 1, skip next st, dc in next st, dc in next ch 1 sp, dc in each of next 3 sts, dc in next ch 1 sp, dc in next st, ch 1, skip next st, rep from * twice more, join with sl st in top of beg ch 3. (56 dc)

Round 5: sl st in each of next 2 sts, ch 3, 5 dc in next st, dc in next st, ch 1, skip next st, dc in next st, dc in next ch 1 sp, dc in each of next 7 sts, dc in next ch 1 sp, dc in next st, ch 1, skip next st, *dc in next st, 5 dc in next st, dc in next st, ch 1, skip next st, dc in next st, dc in next ch 1 sp, dc in each of next 7 sts, dc in next ch 1 sp, dc in next st, ch 1, skip next st, rep from * twice more, join with sl st in top of beg ch 3. (72 dc)

Round 6: sl st in each of next 2 sts, ch 3, 5 dc in next st, dc in next st, ch 1, skip next st, dc in next st, dc in next ch 1 sp, dc in each of next 11 sts, dc in next ch 1 sp, dc in next st, ch 1, skip next st, *dc in next st, 5 dc in next st, dc in next st, ch 1, skip next st, dc in next st, dc in next ch 1 sp, dc in each of next 11 sts, dc in next ch 1 sp, dc in next st, ch 1, skip next st, rep from * twice more, join with sl st in top of beg ch 3. (88 dc)

Round 7: ch 3, dc in each of next 2 sts, 5 dc in next st, dc in each of next 3 sts, ch 1, skip next ch 1 sp, dc in each of next 15 sts, ch 1, skip next st, *dc in each of next 3 sts, 5 dc in next st, dc in each of next 3 sts, ch 1, skip next st, dc in each of next 15 sts, ch 1, skip next st, rep from * twice more, join with sl st in top of beg ch 3. (104 dc)

Round 8: ch 3, dc in each of next 4 sts, 5 dc in next st, dc in each of next 5 sts, ch 1, skip next ch 1 sp, dc in each of next 7 sts, ch 1, skip next st, dc in each of next 7 sts, ch 1, skip next ch 1 sp, *dc in each of next 5 sts, 5 dc in next st, dc in each of next 5 sts, ch 1, skip next st, dc in each of next 7 sts, ch 1, skip next st, dc in each of next 7 sts, ch 1, skip next ch 1 sp, rep from * twice more, join with sl st in top of beg ch 3. (120 dc)

Round 9: ch 3, dc in each of next 6 sts, 5 dc in next st, *dc in each of next 7 sts, dc in next ch 1 sp, dc in next st, (ch 1, skip next st, dc in next st) three times, dc in next ch 1 sp, dc in next st, (ch 1, skip next st, dc in next st) three times, dc in next ch 1 sp**, dc in each of next 7 sts, 5 dc in next st, rep from * three times more ending last repeat at **, join with sl st in top of beg ch 3. (120 dc)

Round 10: ch 1, sc in same st, sc in each of next 8 sts, *(sc, ch 2, sc) in next st,
sc in each of next 11 sts, (sc in next ch 1 sp, sc in next st) three times, sc in next st, (sc in next st, sc in next ch 1 sp) three times**, sc in each of next 11 sts, rep from * three times more ending last repeat at **, sc in each of next 2 sts, join with sl st in beg sc. (148 sc)

Pattern designed and written by April Moreland
© 2011 All rights reserved

Thursday, February 10, 2011

Striped Rectangle Granny


Finished size: approximately 40 inches x 52 inches

Materials: Caron One Pound worsted weight yarn (one skein each of White (CA), Orange (CB, and Deep Violet (CC); US size "I" hook; Tapestry needle for weaving in ends.

Gauge: Rounds 1 - 5 = 5 inches x 17 inches

NOTE: Starting chain is a multiple of 4 + 6.

ch 46

Row 1: With CA and working in back ridge of chain (see Fig. 1) dc in 6th ch from hook, dc in each of next 2 ch, ch 1, skip next ch, (dc in each of next 3 ch, ch 1, skip next ch) 9 times, dc in last ch. Fasten off. (32 dc)

Note: From this point you will be working in the round starting in the last ch 1 sp made on Row 1, continuing along the beginning ch, working into the space created by the beg ch 5, and finally working across the top of Row 1.

Round 2: Join CB with sl st in last ch 1 sp of Row 1, [ch 3, 2 dc, (ch 2, 3 dc) 3 times] in same sp, ch 1, [(3 dc, ch 1) in next ch 1 sp] 9 times, [3 dc, (ch 2, 3 dc) 3 times) in next ch 5 sp, ch 1, [(3 dc, ch 1) in next ch 1 sp] 9 times, join with sl st in top of beg ch 3. Fasten off.

Round 3: Join CA with sl st in first corner of previous round, (ch 3, 2 dc, ch 2, 3 dc, ch 1) in same sp, (3 dc, ch 1) in next ch 1 sp, (3 dc, ch 2, 3 dc, ch 1) in next ch 2 sp, [(3 dc, ch 1) in next ch 1 sp] across to next ch 2 sp, (3 dc, ch 2, 3 dc, ch 1) in next ch 2 sp, (3 dc, ch 1) in next ch 1 sp, (3 dc, ch 2, 3 dc, ch 1) in next ch 2 sp, [(3 dc, ch 1) in next ch 1 sp] across to end of round, sl st in top of beg ch 3. Fasten off.

Round 4: Join CC with sl st in first corner of previous round, (ch 3, 2 dc, ch 2, 3 dc, ch 1) in same sp, [(3 dc, ch 1) in next ch 1 sp] across to next ch 2 sp, (3 dc, ch 2, 3 dc, ch 1) in next ch 2 sp, [(3 dc, ch 1) in next ch 1 sp] across to next ch 2 sp, (3 dc, ch 2, 3 dc, ch 1) in next ch 2 sp, [(3 dc, ch 1) in next ch 1 sp] across to next ch 2 sp, (3 dc, ch 2, 3 dc, ch 1) in next ch 2 sp, [(3 dc, ch 1) in next ch 1 sp] across to end of round, sl st in top of beg ch 3. Fasten off.

Rounds 5-41: Repeat Round 4 changing colors as desired or following the color chart below for 37 rounds or until desired size.

COLOR PATTERN
CA for Row 1
CB for Round
Repeat the following sequence for remaining rounds:
CC, CA, CC, CB, CA, CB...


Pattern written by April Moreland
© 2011 All rights reserved

Rectangle Granny (No Color Changes)

Finished Size: 39 x 51 inches

Materials: Caron Simply Soft Paints* worsted weight yarn (eight 4 ounce balls); US size "H" hook; Tapestry needle for weaving in ends.

*The "Tapestry" colorway was used in the example

Gauge: Row 1 and round 2 = 3 x 15 inches

NOTES:
  1. Starting chain is a multiple of 4 + 6.
  2. Following Row 1 you will be working in the round starting in the last ch 1 sp made on Row 1, continuing along the beginning ch, working into the space created by the beg ch 5, and finally working across the top of Row 1.
  3. Also starting with round 2 you will be joining rounds with a dc in top of the beg ch 3 rather than the traditional sl st join. Using this method eliminates the need to sl st across to next ch sp. This dc should be treated as the normal ch 2 corner sp.
ch 46

Row 1: Working in back ridge of chain dc in 6th ch from hook, dc in each of next 2 ch, ch 1, skip next ch, (dc in each of next 3 ch, ch 1, skip next ch) 9 times, dc in last ch. (32 dc)

Round 2: ch 3, working around last dc on round 1 [2 dc, (ch 2, 3 dc) twice] in same sp, ch 1, [(3 dc, ch 1) in next ch 1 sp] 9 times, [3 dc, (ch 2, 3 dc) 3 times) in next ch 5 sp, ch 1, [(3 dc, ch 1) in next ch 1 sp] 9 times, 3 dc in next ch 1 sp, join with dc in top of beg ch 3.

Round 3: (ch 3, 2 dc, ch 2, 3 dc, ch 1) in same sp, (3 dc, ch 1) in next ch 1 sp, (3 dc, ch 2, 3 dc, ch 1) in next ch 2 sp, [(3 dc, ch 1) in next ch 1 sp] across to next ch 2 sp, (3 dc, ch 2, 3 dc, ch 1) in next ch 2 sp, (3 dc, ch 1) in next ch 1 sp, (3 dc, ch 2, 3 dc, ch 1) in next ch 2 sp, [(3 dc, ch 1) in next ch 1 sp] across to end of round, join with dc in top of beg ch 3.

Round 4: (ch 3, 2 dc, ch 2, 3 dc, ch 1) in same sp, [(3 dc, ch 1) in next ch 1 sp] across to next ch 2 sp, (3 dc, ch 2, 3 dc, ch 1) in next ch 2 sp, [(3 dc, ch 1) in next ch 1 sp] across to next ch 2 sp, (3 dc, ch 2, 3 dc, ch 1) in next ch 2 sp, [(3 dc, ch 1) in next ch 1 sp] across to next ch 2 sp, (3 dc, ch 2, 3 dc, ch 1) in next ch 2 sp, [(3 dc, ch 1) in next ch 1 sp] across to end of round, join with dc in top of beg ch 3.

Rounds 5-30: Repeat round four 21 times or until desired size. Do not fasten off.

Round 31 (border): ch 3, 7 dc in same sp, skip next st, sc in next st, skip next st, [*4 dc in next ch 1 sp, skip next st, sc in next st, skip next st, rep from * to next corner ch 2 sp**, 8 dc in ch-2 sp, skip next st, sc in next st, skip next st] four times ending last repeat at **, join with sl st in top of beg dc, fasten off, weave in ends.


Pattern written by April Moreland
© 2011 All rights reserved

Monday, February 7, 2011

A Meaty Proposition

A couple of weeks ago my son asked me to make him a "plushie" of a game character called Super Meat Boy. After I picked myself up off the floor (he's NEVER shown an interest in the things I crochet before) I happily agreed to make his plushie. And just because I was so excited about crocheting something for him, I also made Bandage Girl, SMB's favorite gal.

I finished them up just in time for his 20th birthday. Here they are, ready to be packaged up:


I wrote the patterns for them. You can find Super Meat Boy here, and Bandage Girl here.

Super Meat Boy

Finished Size: 4 1/2 inches tall

Materials: Worsted Weight Yarn: approximately 1 ounce burgundy; US size "F" hook; 1 pair 12 mm black safety eyes; Fiberfil stuffing; 2.5 inch square black felt; Black sewing thread; Sharp sewing needle; Tapestry needle for weaving in ends.

Head and Body

with burgundy ch 13

Round 1: 2 sc in 2nd ch from hook, sc in each of next 10 ch, 4 sc in next ch, working along opposite side of starting ch sc in each of next 10 ch, 2 sc in last ch. (28

sc)

Round 2: sc in next st, 2 sc in next st, sc in each of next 10 sts, 2 sc in next st, sc in each of next 2 sts, 2 sc in next st, sc in each of next 10 sts, 2 sc in next st, sc in

next st. (32 sc)

Rounds 3 - 17: sc in each st around.

*Attach eyes between rounds 6 and 7 making sure they are evenly spaced . (See photo for example)

Stuff body with fiberfil.

DIVIDE FOR LEGS

Step 1 (first leg)

Round 18: sc in each of next 13 sts, skip next 16 sts (these unworked sts will become the second leg in the next step), sc in each of next 3 sts. (16 sc)

Rounds 19 - 22: sc in each st around.

Stuff leg with fiberfil.

Round 23: sc2tog around. (8 sc)

Round 24: sc2tog around, fasten off leaving tail for sewing. (4 sc)

Using yarn tail, sew opening closed at bottom of leg.

Step 2 (second leg)

Round 18: attach yarn with sl st in first unworked st on round 17, sc in same st and in each st around. (16 sc)

Rounds 19 - 24: rep rounds 19 - 24 of first leg.

*There will be a small gap between the legs, you can sew it together if this bothers you.

Arms (make 2)

Round 1: 6 sc into adjustable loop. (6 sc)

Round 2: 2 sc in each st around. (12 sc)

Rounds 3 - 8: sc in each st around, fasten off at end of round 8 leaving long tail for sewing.

Stuff arms with fiberfil. Using photo as guide, sew one arm to each side of body across rows 8 - 10.

Weave in all ends.

Mouth (use photo as guide)

Cut semi-circle shape from black felt. With black thread and sewing needle, sew mouth to front of ami centered just below the eyes.


Pattern designed and written by April Moreland
© 2011 All rights reserved

Bandage Girl

Finished Size: 4 inches tall

Materials Worsted Weight Yarn: (approximately 1 ounce Pink, several yards each white and yellow); US size "F" hook; 1 pair 12 mm black safety eyes; Fiberfill stuffing; 2.5 inch square black felt; Black sewing thread; Sharp sewing needle; Tapestry needle for weaving in ends.

Head and Body

with pink ch 11

Round 1: 2 sc in 2nd ch from hook, sc in each of next 8 ch, 4 sc in next ch, working along opposite side of starting ch sc in next 8 ch, 2 sc in last ch. (24 sc)

Round 2: sc in next st, 2 sc in next st, sc in each of next 8 sts, 2 sc in next st, sc in each of next 2 sts, 2 sc in next, sc in each of next 8 sts, 2 sc in next st, sc in next st. (28 sc)

Rounds 3 - 15: sc in each st around.

*Attach eyes between rounds 5 and 6 making sure they are evenly spaced. (See photo for example)

DIVIDE FOR LEGS

Step 1 (first leg)

Round 16: sc around. (14 sc)

Rounds 17 - 19: sc in each st around.

Round 20: sc2tog around (7 sc)

Step 2 (second leg)

Round 16: sc around. (14 sc)

Rounds 17 - 19: sc in each st around.

Round 20: sc2tog around (7 sc)

*There will be a small gap between the legs, you can sew it together if this bothers you.

Arms (make 2)

Round 1: 5 sc into adjustable loop. (5 sc)

Round 2: 2 sc in each st around. (10 sc)

Rounds 3 - 7: sc in each st around, fasten off at end of round 7 leaving long tail for sewing.

Stuff arms with fiberfil. Using photo as guide, sew one arm to each side of body across rows 7 - 8.

Flower

Center: With yellow make 5 sc into adjustable loop, join with sl st in beg sc, fasten off.

Petals: Join white with sl st in any st, (ch 2, dc, ch 2, sl st) in same st, *(sl st, ch 2, dc, ch 2, sl st) in next st, rep from * 3 times more, fasten off leaving tail for sewing.

Attach flower to top right corner of head. (See photo for example)

Weave in all ends.

Mouth (use photo as guide)

Cut semi-circle shape from black felt. With black thread and sewing needle, sew mouth to front of ami centered just below the eyes.


Pattern designed and written by April Moreland
© 2011 All rights reserved

Saturday, January 22, 2011

So Easy A Caveman Could Do it

Everytime I look at these gecko keychains I think of the Geico Gecko. They were made from a kit that Ben received in a goodie package that Cyndi received for him. He allowed me to make them for him and as "payment," gifted me with the bright lime green one. He knows his Mom-mom so well! :)

Sunday, January 16, 2011

Winter Blossom

Finished Size: 6 or 12 inches

Materials: Worsted Weight Yarn: approximately 2 ounces in each color A, and color B; US size "H" hook; tapestry needle for weaving in ends.

12 inch example (shown above): Pattern was worked using Red Heart Super Saver in Lt Blue for color A, and Red Heart Super Saver in Royal for color B.

6 inch example (shown below): Pattern was worked using Red Heart Super Saver in Royal for color A, and Red Heart Super Saver in White for color B. (*See note below for instructions for 6 inch square.)

With color A ch 4, sl st in 4th ch from hook to form loop

Round 1: ch 3, [2 dc, ch 1, (3 dc, ch 1) 4 times] in loop, join with sl st in top of beg ch 3. (15 dc)

Round 2: ch 3, dc in each of next 2 sts, (dc, ch 1, dc) in next ch sp, [dc in each of next 3 sts, (dc, ch 1, dc) in next ch sp] 4 times, join with sl st in top of beg ch 3. (25 dc)

Round 3: ch 3, 3 dc in next st, dc in next st, hdc in next st, sl st in next ch sp, (hdc in next st, dc in next st, 3 dc in next st, dc in next st, hdc in next st, sl st in next st) 4 times, hdc in next st, sl st in top of next beg ch 3 to join, change to color B. (25 dc, 10 hdc)

Round 4: Working in BLO ch 2, (sc in next st, 2 sc in next st, sc in next st, hdc in next st, dc in next st, 2 dc in next sl st, dc in next st, hdc in next st, sc in each of next 3 sts, hdc in next st, dc in next st, 2 dc in next st, dc in next st, hdc in next st) twice, sc in next st, 2 sc in next st, sc in next st, hdc in next st, dc in next st, 2 dc in next sl st, dc in next st, join with sl st in beg ch 2. (20 dc, 18 sc)

Round 5: ch 3, [(2 dc, ch 2, 2 dc) in next st, dc in each of next 3 sts, hdc in next st, sc in each of next 3 sts, hdc in next st, dc in each of next 3 sts] 3 times, (2 dc, ch 2, 2 dc) in next st, dc in each of next 3 sts, hdc in next st, sc in each of next 3 sts, hdc in next st, dc in each of next 2 sts, join with sl st in top of beg ch 3, fasten off. (40 dc, 12 sc)

Round 6: ch 3, dc in each of next 2 sts, [(2 dc, ch 2, 2 dc) in next ch sp, dc in each st across to next ch sp] 3 times, (2 dc, ch 2, 2 dc) in next ch sp, dc in each rem st across, join with sl st in top of beg ch 3, fasten off. (76 dc)

Round 7: Join color A with sl st in any ch 2 sp, ch 1, 3 sc in same ch sp, sc in each st across to next ch 2 sp, (3 sc in next ch sp, sc in each st across to next ch 2 sp) 3 times, join with sl st in top of beg sc, fasten off.

Round 8: Join color B with sl st in center st of any corner, ch 3, (dc, ch 2, 2 dc) in same sp, dc in each st across to center st of next corner, [(2 dc, ch 2, 2 dc) in next st, dc in each st across to center st of next corner] 3 times, join with sl st in top of beg ch 3, fasten off.

Rounds 9 - 12: Repeat rounds 7 and 8 twice more. Weave in all ends.

*NOTE: For 6 inch square work as follows:

Rounds 1 - 5: Work same as rounds 1-5 of 12 inch square, fasten off at end of round 5.

Round 6: Work same as round 7 of 12 inch square. Weave in all ends.

Pattern designed and written by April Moreland
© 2011 All rights reserved

Back to main Charity 'Ghan CAL page

Saturday, January 15, 2011

2011 Charity 'Ghan CAL

I decided to do a charity CAL this time. For this reason I have designed the squares with a minimal amount of holes so they will be appropriate for most charities including those for babies and the homeless. I hope that you will decide to donate a square or two made from this collection of patterns to your favorite charity. :)

MATERIALS: The materials are the same for each square. You will need a US size "H" hook, and approx 3 - 4 ounces Worsted Weight yarn.

FINISHED SIZE: The finished size of each square is 12 inches. Most, if not all, will have a 6 inch option.

Below you will find the list of links to the square patterns. Each new pattern will be linked on approximately the 16th of the month. For easy access to the CAL patterns you may want to bookmark this link. Any new information about the CAL will be added to this post.

Square 1 (January) - Winter Blossom

Square 2 - (February) - Seeing Spots

Square 3 - (March) - Green Thumb

Square 4 - (April) - Corn Flower

Square 5 - (May) - Sailing Along

Square 6 - (June) - Orange Blossom

ENJOY!

All patterns for this CAL are designed and written by April Moreland
© 2011 All rights reserved

Friday, January 14, 2011

Wednesday, January 5, 2011

Tuttle's New Friend

I heard from Tuttle just a little while ago. I am happy to say he arrived in his new home and is loving his new warm surroundings. In fact, he tells me he met a friend during his travels. Tuttle sent some pictures of his traveling companion and newest friend Mr. Buttons.


They met on the road and decided to travel together in search of warm and sunny weather in Florida.

Here you can see them frolicking and riding the waves together in the warm waters of the Atlantic Ocean.

Monday, January 3, 2011

Hello 2011!

Well, the holidays have come and gone without leaving any permanent battle scars (other than the one on my bank account!) and it's back to the grindstone as it were. Things were hectic as usual for the month of December, but work resumes today and that will be the ticket to getting everything back to whatever passes for normal around here. So as we say our final farewells to 2010, and hope for more prosperous times in 2011, I thought I'd give a little sneak peek at what is on the agenda for The Left Side of Crochet this year...
  • New patterns and CALs for 2011
    • I have a couple of squares designed that I am using as the beginning of a new afghan CAL similar to the Calendar 'Ghan. This one will be a little more relaxed and will feature fewer squares, or maybe not... depending on how inspired I am. :) Look for it to begin around the 15th of this month.
    • Some of you may remember that I tried last year (or was it the year before? My memory has headed south for the winter it seems...) to organize a stitch sampler to be designed by several designers. I couldn't quite get enough people to commit to help design it, but I've decided it's a task I'd like to take on myself this year. So be sure to watch for that to begin soon-ish.
    • There are several patterns that I've been "sitting on" waiting for me to convert to PDF so I can put them up on Etsy and Ravelry. I hope to finally get them finished this year!
  • New sewing projects
    • The sewing bug has bitten and I'm feeling lots of inspiration lately with thread and fabric. I see lots of tote bags, hook cases, jewelry pouches, purses, and maybe even some simple wearables in my future.
    • I promised my daughter (Diane) a new flannel rag quilt at Christmas. We have come up with a design, nothing fancy, just a simple four patch but we like it. :) I plan to start cutting this week and will begin sewing soon after. I will be taking pictures as I go. (A new tutorial perhaps?)
  • Other creative and crafty stuff
    • Color! I have some colorful surpises for you coming up soon. I don't have the details worked out just yet, but you'll know it when you see it. :)
    • Charity-I didn't keep strict count of my charity projects for 2010, but I know I donated at least 6 lap-ghans to an Ohio nursing home, several scarves to victims of domestic abuse, and some hats, squares, and other useful items to various charities as needed. I plan to keep this tradition for 2011 and hope others will join me in providing comfort to those in need via the art of crochet!

Saturday, December 25, 2010

Happy Holidays!

Santa has been here, eaten his snack, and left a thoughtful note for Ben...

In return he left a HUGE pile of presents...

And some crafty goodness for the rest of the family...

For son Matthew, a cozy fleece blanket with crochet edging...


And a unique "Nintendo" clock...
Son in law Damian got a hat and scarf (per his request)...

Daughter in law Tammy also got a cozy fleece blanket, and a matching pillow in her favorite colors :)

Cyndi asked Santa for a red doily to accent her wedding bouquet table display...

And finally, Santa got a little behind so had to leave a couple of I.O.U.s

He was able to finish the motifs for Cyndi & family's Polka Dot Stockings, but no matter how quickly his elves worked, they just couldn't get them assembled. :( I hear he's going to sneak back from the North Pole one evening soon to finish them up though. :)


The other I.O.U. was included in a box full of flannel to be used for a rag quilt to be designed and completed to order A.S.A.P. for daughter Diane.


There were lots of other non crafty gifts exchanged, including a new crafting table for ME! I was quite excited about that. I now have a place to set up a crafting station and sewing table permamently! I had been using the kitchen table which just wasn't convenient for anyone, especially me.

It's been a good day here. The family is together and that is the best gift of all.

Wherever you are, whatever you are doing, whichever holiday you celebrate, I wish you much love and happiness for a special holiday today and always.

*Peace*

Friday, December 10, 2010

Tuttle The Turtle

The story of Tuttle The Turtle begins on a cold Winter's day.


The snow was falling outside and poor Tuttle was longing for the warmth of the southern climates he had heard so much about.


Tuttle reluctantly decided he must leave his cold Ohio home for a place that is warm all year long. He knew he would miss his friends in the cold northern state. But sadly, he knew he must leave.


"Florida might be a nice place to go," he thought. Promising to write, Tuttle said his goodbyes...

and began his long journey heading south.


We will miss you, but we know you will be happy in your new home and loved by your new family. Take care Tuttle, and goodbye see ya later.

xoxo

Monday, December 6, 2010

My New Oven Mitt

I came across a tutorial online for an oven mitt a few days ago. Cyndi had some scraps laying around so I decided to try my hand at making one for myself. It came out pretty decent... but maybe a bit small. Here's the result, whatchya think?

Isn't this just the cutest thing?

It's not nearly as tedious as it looks. Hop on over to Obsessively Stitching and have a look at her awesome tutorial. And maybe make one, or two, or ten (LOL) for yourself! I'm already digging through my fabric stash to make more!