Sunday, November 21, 2010

DJ Ben Rock Is In Da House!


Anyone with a toddler running around should recognize this bright orange fellow from Nick Jr's Yo Gabba Gabba. Yes, Halloween has been over for 3 weeks, but I still wanted to post a picture of Ben's costume. Well, the hat to be exact.

The hat that came with the DJ Lance Rock costume didn't fit at all, not to mention is was a bit cheesy. So armed with a J Hook, a skein of RHSS in Pumpkin, and a ball of Orange Yarn Bee Haute Fur, I embarked on the mission of creating a proper fitting, and cooler looking, hat. I think I succeeded. :)


Stay tuned for the pattern in an upcoming blog post!

Wednesday, November 17, 2010

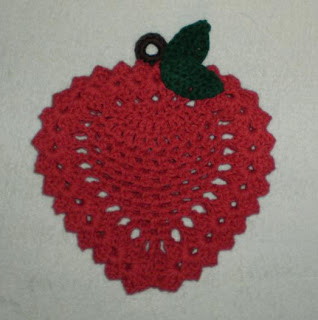
Apple Trivet


Finished size: Approximately 9 x 7 inches

Materials: (US) size G hook, Worsted Weight Cotton: 2 oz main color, scraps of green, and brown. (Example was made using Sugar‘n Cream in Red and Dk Pine, and I Love This Cotton in Brown), tapestry needle

Weave in ends as work progresses.

APPLE (make 2)

ch 6, join with sl st to form loop

Row 1: (ch 3, 2 dc, ch 1, 3 dc, ch 2, 3 dc, ch 1, 3 dc) in loop, turn.

Row 2: sl st in each of next 2 sts, sl st into next ch-1 sp, (ch 3, 2 dc, ch 1, 3 dc) in same sp, 6 dc in next ch-2 sp, (3 dc, ch 1, 3 dc) in next ch-1 sp, turn.

Row 3: sl st in each of next 2 sts, sl st into next ch-1 sp, (ch 3, 2 dc, ch 1, 3 dc) in same sp, ch 1, skip next 3 dc, 2 dc in each of next 6 sts, ch 1, (3 dc, ch 1, 3 dc) in next ch-1 sp, turn.

Row 4: sl st in each of next 2 sts, sl st into next ch-1 sp, (ch 3, 2 dc, ch 1, 3 dc) in same sp, ch 1, skip next 3 sts, (sc, ch 2) in each of next 11 sts, (sc, ch 1) in next st, (3 dc, ch 1, 3 dc) in next ch-1 sp, turn.

Row 5: sl st in each of next 2 sts, sl st into next ch-1 sp, (ch 3, 2 dc, ch 1, 3 dc) in same sp, ch 1, skip next 3 sts, (sc, ch 2) in each of next 10 ch-2 sps, (sc, ch 1) in next ch-2 sp, (3 dc, ch 1, 3 dc) in next ch-1 sp, turn.

Row 6: sl st in each of next 2 sts, sl st into next ch-1 sp, (ch 3, 2 dc, ch 1, 3 dc) in same sp, ch 1, skip next 3 sts, (sc, ch 2) in each of next 9 ch-2 sps, (sc, ch 1) in next ch-2 sp, (3 dc, ch 1, 3 dc) in next ch-1 sp, turn.

Row 7: sl st in each of next 2 sts, sl st into next ch-1 sp, (ch 3, 2 dc, ch 1, 3 dc) in same sp, ch 1, skip next 3 sts, (sc, ch 2) in each of next 8 ch-2 sps, (sc, ch 1) in next ch-2 sp, (3 dc, ch 1, 3 dc) in next ch-1 sp, turn.

Row 8: sl st in each of next 2 sts, sl st into next ch-1 sp, (ch 3, 2 dc, ch 1, 3 dc) in same sp, ch 1, skip next 3 sts, (sc, ch 2) in each of next 7 ch-2 sps, (sc, ch 1) in next ch-2 sp, (3 dc, ch 1, 3 dc) in next ch-1 sp, turn.

Row 9: sl st in each of next 2 sts, sl st into next ch-1 sp, (ch 3, 2 dc, ch 1, 3 dc) in same sp, ch 1, skip next 3 sts, (sc, ch 2) in each of next 6 ch-2 sps, (sc, ch 1) in next ch-2 sp, (3 dc, ch 1, 3 dc) in next ch-1 sp, turn.

Row 10: sl st in each of next 2 sts, sl st into next ch-1 sp, (ch 3, 2 dc, ch 1, 3 dc) in same sp, ch 1, skip next 3 sts, (sc, ch 2) in each of next 5 ch-2 sps, (sc, ch 1) in next ch-2 sp, (3 dc, ch 1, 3 dc) in next ch-1 sp, turn.

Row 11: sl st in each of next 2 sts, sl st into next ch-1 sp, (ch 3, 2 dc, ch 1, 3 dc) in same , ch 1, skip next 3 sts, (sc, ch 2) in each of next 4 ch-2 sps, (sc, ch 1) in next ch-2 sp, (3 dc, ch 1, 3 dc) in next ch-1 sp, turn.

Row 12: sl st in each of next 2 sts, sl st into next ch-1 sp, (ch 3, 2 dc, ch 1, 3 dc) in same ch sp, ch 1, skip next 3 sts, (sc, ch 2) in each of next 3 ch-2 sps, (sc, ch 1) in next ch-2 sp, (3 dc, ch 1, 3 dc) in next ch-1 sp, turn.

Row 13: sl st in each of next 2 sts, sl st into next ch-1 sp, (ch 3, 2 dc, ch 1, 3 dc) in same sp, ch 1, skip next 3 sts, (sc, ch 2) in each of next 2 ch-2 sps, (sc, ch 1) in next ch-2 sp, (3 dc, ch 1, 3 dc) in next ch-1 sp, turn.

Row 14: sl st in each of next 2 sts, sl st into next ch-1 sp, (ch 3, 2 dc, ch 1, 3 dc) in same ch sp, ch 1, skip next 3 sts, (sc, ch 2) in next ch-2 sp, (sc, ch 1) in next ch-2 sp, (3 dc, ch 1, 3 dc) in next ch-1 sp, turn.

Row 15: sl st in each of next 2 sts, sl st into next ch-1 sp, (ch 3, 2 dc, ch 1, 3 dc) in same sp, dc in next ch-2 sp, (3 dc, sl st in ch 1 sp of beg shell to join bottom, 3 dc) in next ch-1 sp, fasten off.

LEAVES (make 2)

ch 9

Row 1: sl st in 2nd ch from hook, hdc in next ch, dc in each of next 5 ch, (hdc, ch 1, sl st) in next ch, (working along opposite side of starting ch (ch 1, hdc) in first ch, dc in each of next 5 ch, hdc in next ch, sl st in next ch, fasten off.

STEM (hanging loop)

ch 8, join with sl st to form loop

Round 1: 12 sc in loop, fasten off.


ASSEMBLY

1. Using red yarn and holding the 2 apple pieces wrong sides together, sew around the outer edge to join.

2. Arrange leaves on front of trivet as desired (see photo for example) and sew into place one at a time using green yarn.

3. Sew stem/hanging loop into place at top of trivet (see photo for example) using red or brown yarn.

Ribbed Washcloth


Finished size: 7" Square

Materials:
(US) size 7 needles, 2 ounces Worsted Weight Cotton in desired color (Example was made using I Love This Cotton in the Carousel colorway)

Cast on 35.

Row 1: k3, (p1, k3) across. (35 sts)
Row 2: k1, (p1, k3) across to last 2 sts, p1, k1.
Rows 3 - 35: rep rows 1 and 2 ending with a row 1 rep.
Row 36: Bind off in pattern as established in row 2.

Finish off. Weave in ends. Block to 7" square.


Pattern designed and written by April Moreland
© 2010 All rights reserved

Monday, November 15, 2010

Share A Square

During my cyber travels this morning I came across the Share A Square blog. I had heard the name before but didn't know exactly what it was. After reading through the FAQs page this is definitely something I want to help out with. Like many of you I have a jam packed schedule through the holidays, but once my Christmas crocheting & sewing is completed I will be jumping on this project. I just thought I'd share the site with you here in hopes that you'll join me in helping this project meet its goal.

Sunday, November 14, 2010

Sweet & Simple Charity Scarf


MATERIALS: (US) size J hook, 1 skein Worsted Weight yarn (I Love This Yarn in the Sweet Mocha Multi colorway was used for example), tapestry needle

NOTE: BLO = back loop only

Ch 20

Row 1: dc in 4th ch from hook and in each ch across, turn. (18 dc)

Row 2: ch 3, working in BLO dc in next st and in each st across, turn.

Repeat row 2 (ending on an even row) until scarf is desired length or until skein is used up.  (I usually get somewhere around 80 rows)

Finish off. Weave in ends. Add fringe if desired.

Pattern designed and written by April Moreland
© 2010 All rights reserved

Tuesday, November 9, 2010

Odiferous Fiber

I've been seeing a lot of questions pop up on blogs and in groups around the net pertaining to foreign odors in yarn. Whether it's the result of a smoker, the family pet(s), or just plain funkitude (did I just invent a word?) it's something that needs to be dealt with.

First of all, consider the source of the smell. If it comes from smoke, or some other "additive," you are going to want to wash the yarn to remove any remaining residue. Of course you can just wash the yarn and be done with it all in one fell swoop, but it's probably easier to wash a finished item than it is a skein of yarn (plus a finished item will dry WAY faster than a skein of yarn!) Just food for thought.

Secondly, keep in mind that I am in no way an authority on the subject. I just thought I'd gather a few suggestions that I, and others, have found successful for removing those offensive smells.

> Erika over at Crochet by Day used some Febreeze and good ole fashioned sunshine to wipe out her "Yarn Funk".

> This idea is from me but inspired by Cyndi. Of course people have been using baking soda for years in the fridge for keeping odors at bay. Cyndi started sprinkling it on the carpet to avoid the unwanted odors that owning a dog can bring. She also uses it to remove foul odors from anything plastic. So I had the idea to place one of the fridge packs in with a box of offensive yarn. Leave it in the closed box overnight, or a couple of days for stronger smells, and you will have odor free yarn.

> And here is a discussion over on the 'ville regarding washing a whole skein yarn. It seems wrapping it up in a knee high stocking and letting it run through the machine is a go!

That's what I have for now. What have you used to remove unwanted odor from your yarn?

Wednesday, September 8, 2010

Last Slice of Summer

There is a relatively new forum over on Crochetville entitled "Giveaways" (you may need to be logged in to see it) in which I have been lurking here of late. It's a simple concept. A member posts an item that they've made to the forum and then chooses a fellow member to give it away to.

There are various methods for choosing a recipient. Some post pictures and then have people request to be added to the list, then they choose from the recipient from the compiled list. Others simply choose people at random to receive their lovely gifts.

Many of the "Giveawayers" make and offer an item each month. Usually the same item but in a different color or style. Tammy, of Coffee n' Crafts fame, has been offering a crocheted hook cake each month. Her cases are usually themed for the month, and are always super cute and awesome.

My favorite so far has been the *Summer Time Seeds* Hook Case. I had seen the post and knew I loved it and wished I could have it, but knew there were a LOT of people who felt the same way as I. So imagine my surprise when I saw that big puffy envelope with her return address on it!

Isn't it just AwEsOmE?!

And packed with extra goodies too!

THANK YOU Tammy!!! I love, love, love it!

:)

Wednesday, September 1, 2010

Algebraic Equation

Ben + Afghan ÷ Scissors = Sad MomMom3

I should know better than to turn my back on a 2 year old, even for a second, for I know terrible and destructive things can, and will, happen. I take full responsibility for it though. I should have put the scissors up.

I had been crocheting dilligently the night before. I was in the homestretch. I was almost finished the project. Nothing like this has happened before. He honestly thought he was helping. He started crying when I cried, the poor thing. I should have put those darn scissors up!

*sigh*

Since Ben's "surgery" on my latest project I've been in a crochet slump. I still haven't brought myself to attempt re-construction. I did, however, finally bring myself to inspect the damage. It won't be impossible to fix. It's an afghan done in strips. One of the strips is beyond repair, but the other 2 that were damaged shouldn't be too difficult to fix. whew

Tears were shed, lessons were learned (on both sides). The scissors are safely hidden away on the highest shelf, where they belong, safe from adventurous little fingers. :)

Saturday, August 28, 2010

Drop Dead Fred

My thumb is brown after all. :(

Whoever said you can't kill a succulent has never met me.

He was doing so well. I managed to keep him alive for 10 whole months with only minor mishap. He even had a little bud at the base of his stem. Life was good for Fred. But the move out here proved to be his demise. Well, not the move itself actually, it was me, I'm a horticultural murderess.

When we arrived in Ohio on Saturday afternoon 3 weeks ago all I wanted to do was escape from my cramped quarters in the backseat of Cyndi's Lancer. But in doing so, I left my healthy green companion sitting in the back window of the car, and thus subject to the heat of the car on a hot summer day. My absent mindedness cooked (literally) my poor little friend.

R.I.P. Fred, you will be missed :(

Thursday, August 19, 2010

Moving Vans, Beef Lo Mein, & Birthday Cake

The secret to staying young is to live honestly, eat slowly, and lie about your age. ~ Lucille Ball

There have been lots of happenings lately on the Left Side of Crochet. First of all, our stint in Missouri came to an abrupt end a few weeks ago. To quote Popeye, "That's all [we] can stands, and [we] can't stands no more."

In short, the economy got the better of us.

So we packed up our gear, (including over 20 boxes of yarn!) and started heading East. We came to rest in a quaint little town in NE Ohio situated right on Lake Erie. It has that perfect little hometown feel. Not too slow as to be boring, but not too bustling as to feel frenzied.

It wasn't a random pick. We chose the area, #1, because it's a factory town with plenty of jobs for the taking, and #2 (and most importantly), because it is where my youngest daughter lives.

It's so incredibly good to have the family together again!

And just in time for my special day...


Monday, July 5, 2010

Surf & Turf


Chain a multiple of 15 + 2

Row 1: dc in 4th ch from hook, dc in each of next 2 ch, *[skip next 3 ch, (4 dc, ch 1, 4 dc) in next ch (shell made), skip next 3 ch], dc in each of next 8 ch, rep from * across to last 11 ch, rep between [ ] once more, dc in last 4 ch, ch 3, turn.

Row 2: dc in each of next 3 sts, *[ch 3, skip next 4 sts, sc in next ch 1 sp, ch 3, skip next 4 sts], dc in each of next 8 sts, rep from * across to last shell, rep between [ ] once more, dc in last 4 sts, ch 3, turn.

Row 3: dc in each of next 3 sts, *[skip next ch 3 sp, (4 dc, ch 1, 4 dc) in next st, skip next ch 3 sp], dc in each of next 8 sts, rep from * across to last shell, rep between [ ] once more, dc in last 4 sts, ch 3, turn.

Row 4: dc in each of next 3 sts, *[ch 3, skip next 4 sts, sc in next ch 1 sp, ch 3, skip next 4 sts], dc in each of next 8 sts, rep from * across to last shell, rep between [ ] once more, dc in last 4 sts, ch 3, turn.

Repeat rows 3 and 4 to desired size.


You can see my previous blog post about this stitch pattern here.

Sunday, July 4, 2010

Majesty Square


Finished Size: 12 inches square

Materials: Worsted Weight Yarn: approximately 2 ounces in each color A, and color B*; US size "H" hook; tapestry needle for weaving in ends.

*In example shown Red Heart Super Saver in Lavender was used for color A, and Red Heart Super Saver in Soft White was used for color B


With color A ch 5, sl st in 5th ch from hook to form loop

Round 1: ch 3, [2 dc, ch 2, (3 dc, ch 2) 3 times] in loop, join with sl st in top of beg ch 3.

Round 2: ch 3, dc in each of next 2 sts, *ch 2, sc in next ch 2 sp, ch 2, dc in each of next 3 sts, rep from * twice more, ch 2, sc in next ch 2 sp, ch 2, join with sl st in top of beg ch 3.

Round 3: ch 2, dc next 2 sts together, *ch 3, skip next ch 2 sp, (sc, ch 3, sc) in next sc, ch 3, skip next ch 2 sp, dc next 3 sts together (cluster made), rep from * twice more, ch 3, skip next ch 2 sp, (sc, ch 3, sc) in next sc, ch 3, skip next ch 2 sp, skip beg ch 2, sl st in top of next st to join, fasten off.

Round 4: Skip next ch 3 sp, join color B with sc in next ch 3 sp, *ch 2, skip next ch 3 sp, (4 dc, ch 2, 4 dc) in next st, ch 2, skip next ch 3 sp, sc in next ch 3 sp, rep from * twice more, ch 2, skip next ch 3 sp, (4 dc, ch 2, 4 dc) in next st, ch 2, skip next ch 3 sp, join with sl st in beg sc.

Round 5: ch 3, *2 dc in next ch 2 sp, dc in each of next 4 sts, (2 dc, ch 2, 2 dc) in next ch 2 sp, dc in each of next 4 sts, 2 dc in next ch 2 sp, dc in next st, rep from * twice more, 2 dc in next ch 2 sp, dc in each of next 4 sts, (2 dc, ch 2, 2 dc) in next ch 2 sp, dc in each of next 4 sts, 2 dc in next ch 2 sp, join with sl st in top of beg ch 3, fasten off.

Round 6: Join color A with sl st in any ch 2 sp, ch 3, (dc, ch 2, 2 dc) in same sp, *(ch 1, skip next st, dc in each of next 2 sts) twice, ch 1, skip next st, dc in each of next 3 sts, (ch 1, skip next st, dc in each of next 2 sts) twice, ch 1, skip next st**, (2 dc, ch 2, 2 dc) in next ch 2 sp, rep from * three times more ending last repeat at **, join with sl st in top of beg ch 3.

Round 7: ch 3, dc in next st, *(2 dc, ch 2, 2 dc) in next ch 2 sp, (dc in each of next 2 sts, ch 1, skip next ch 1 sp) three times, dc in each of next 3 sts**, (ch 1, skip next ch 1 sp, dc in each of next 2 sts) three times, rep from * three times more ending last repeat at **, (ch 1, skip next ch 1 sp, dc in each of next 2 sts) twice, ch 1, skip next ch 1 sp, join with sl st in top of beg ch 3, fasten off.

Round 8: Join color B with sl st in any ch 2 sp, ch 3, (dc, ch 2, 2 dc) in same sp, *dc in each of next 4 sts, dc in next ch 1 sp, (dc in each of next 2 sts, dc in next ch 1 sp) twice, dc in each of next 3 sts, dc in next ch 1 sp, (dc in each of next 2 sts, dc in next ch 1 sp) twice, dc in each of next 4 sts**, (2 dc, ch 2, 2 dc) in next ch 2 sp, rep from * three times more ending last repeat at **, join with sl st in top of beg ch 3, fasten off.

Round 9: Join color A with sl st in any ch 2 sp, ch 3, (dc, ch 2, 2 dc) in same sp, *(ch 1, skip next st, dc in each of next 2 sts) four times, ch 1, skip next st, dc in each of next 3 sts, (ch 1, skip next st, dc in each of next 2 sts) four times, ch 1, skip next st**, (2 dc, ch 2, 2 dc) in next ch 2 sp, rep from * three times more ending last repeat at **, join with sl st in top of beg ch 3.

Round 10: ch 3, dc in next st, *(2 dc, ch 2, 2 dc) in next ch 2 sp, (dc in each of next 2 sts, ch 1, skip next ch 1 sp) five times, dc in each of next 3 sts**, (ch 1, skip next ch 1 sp, dc in each of next 2 sts) five times, rep from * three times more ending last repeat at **, (ch 1, skip next ch 1 sp, dc in each of next 2 sts) four times, ch 1, skip next ch 1 sp, join with sl st in top of beg ch 3, fasten off.


Pattern designed and written by April Moreland
© 2010 All rights reserved

Wednesday, June 30, 2010

Sunday, June 20, 2010

New Blog

I've been dealing with some personal issues of late. I started a blog to help me sort out my emotions and help myself get well again. It will be mostly short essays, healthful tips, and the occasional bit of crochet as it relates to the subject matter. It is called Confessions of an Overweight Hooker. The link is http://fathooker.blogspot.com/ if you'd like to check it out.

Thursday, June 10, 2010

2-D Butterfly


In honor of the 1.5 million children who perished in the Holocaust
Read more about The Butterfly Project


Materials: any weight yarn or thread (scrap amount in main color, 10 inch piece in contrasting color), hook size appropriate for yarn/thread used, tapestry needle for weaving in ends, fabric stiffener (optional)

Finished Size
Thread (shown above) with (US) size 7 steel hook: 2.5 inches x 1.75 inches (blocked)
Sport (3) with (US) size D hook: 3 inches x 2.25 inches (unblocked)
Worsted (4) with (US) size H hook: 4.75 inches x 3.5 inches (unblocked)

Special Stitches:
Picot: ch 3, sl st in 3rd ch from hook

ch 5, join with sl st in 5th ch from hook to form loop

Row 1: ch 3, dc in loop, [ch 1, 2 dc in loop] 5 times, turn. (12 dc)

Row 2: 5 dc in next ch 1 sp (shell made), shell in next ch 1 sp, sc in next ch 1 sp, shell in each of next 2 ch 1 sp, sl st in top of beg ch 3 from previous row, ch 1, turn. (4 shells)

Row 3: {dc, in next st, 2 tr in next st, (tr, picot, tr) in next st, 2 tr in next st, dc in next st} (upper wing made), sl st in sp between shells, [dc in next st, 2 dc in next st, (dc, picot, dc) in next st, 2 dc in next st, dc in next st] (lower wing made), sl st in next sc, rep between [ ] for second lower wing, sl st in sp between shells, rep between { } for second upper wing, sl st in same st as last dc made. Fasten off, weave in ends.

FINISHING

1. Measure the center most portion of your butterfly from top to bottom (where the body would normally be on a butterfly. See Fig 1.) Fold contrasting color yarn or thread in half. Wrap folded yarn around center of butterfly from back to front. (see Fig 2) Tie an overhand knot close to top of butterfly as indicated in Fig 3.

2. Making sure not to twist the loop, place the folded piece around the center of the body and pull knot through the loop. (see Fig. 4) Trim antennae to desired length.

3. Stiffen as desired.


Fig. 1


Fig. 2


Fig. 3


Fig. 4


Made with Worsted Weight (4)

Made with Sport/Baby Weight (3)
Pattern designed and written by April Moreland
© 2010 All rights reserved

Sunday, May 16, 2010

A Day at the Fair

Cyndi, Ben, and I spent this past Saturday splashing in the mud and playing with fiber! We visited the HFA Fiber Fair 2010 in Marshfield, Mo. It rained off and on most of the day but everything was in the pavilions so we stayed dry (for the most part) and had a blast! :)

We weren't there but about 3 or 4 minutes when a woman handed me a card and said, "You've won a door prize!" It was a lovely assortment of Goat's Milk bath products in a basket shaped like the state of Missouri, provided by Misty Woods ~ Home, Health, and Goat's Milk Products.


Next it was off to look at the craft tables and all the fiber goodies. There were so many gorgeous handmade items. And the yarns were so much fun to look at. I bought some hand dyed wool for Cyndi to play with:


And I got myself some pencil roving so I can try my hand at Kool-Aid dying and needle-felting:


Oh, and we picked up a couple of hot chicks too! (Pot holders) LOL


But the real reason we were there, at least as far as Ben was concerned, was to look at all the animals:

Little Lambs


Alpacas


Alpaca after shearing


And the most impressive: A lady spinning angora directly from the bunny while he's sitting on her lap. Sorry for the dark picture... the lighting was bad for that one. :(


After the fair we went up to Springfield to visit A New Yarn (my favorite LYS!) where I bought some Noro Silk Garden to make myself a new bag. :)


Well, we were exhausted when we got home but it was totally worth it! We will definitely be going to the fair again next year! :)

Wednesday, May 5, 2010

Civil War Era Shawl

A reproduction of the shawl found at: http://www.shasta.com/suesgoodco/newcivilians/womenswear/ladycoats.htm#Shawls

Finished Size: 34 inches at center point (not including fringe)

Materials: Worsted Weight Yarn; US size "H" hook; Stitch Marker; Tapestry Needle (for weaving in ends)

Ch 6, join with sl st in 1st ch to form loop.

*Note: Place marker as indicated on Row 3 to mark center ch 3 space. Move marker up each row as you work being sure to keep it in the center ch 3 sp.

Row 1: ch 5 (counts as beg ch 3 + ch 2 now and throughout), (3 dc, ch 3, 3 dc, ch 2, dc) all in same loop, turn.

Row 2: ch 5, (3 dc, ch 1) in next ch 2 sp, (3 dc, ch 3, 3 dc, ch 1) in next ch 3 sp, (3 dc, ch 2) in next ch 2 sp, dc in top of beg ch 3, turn.

Row 3: ch 5, (3 dc, ch 1) in next ch 2 sp, (3 dc, ch 1) in next ch 1 sp, [3 dc, ch 3 (*mark as center ch 3 sp), 3 dc, ch 1] in next ch 3 sp, (3 dc, ch 1) in next ch 1 sp, (3 dc, ch 2) in next ch 2 sp, dc in top of beg ch 3, turn.

Row 4: ch 5, (3 dc, ch 1) in next ch 2 sp, (3 dc, ch 1) in each ch 1 sp across to last ch 1 sp before center ch 3 sp, (3 dc, ch 3, 3 dc, ch 1) in center ch 3 sp, (3 dc, ch 1) in each remaining ch 1 sp across, (3 dc, ch 2) in next ch 2 sp, dc in top of beg ch 3, turn.

Rows 5-33: Repeat row 4, do not turn at end of row 33.

NOTE: Shawl may be made longer by repeating Row 4 until desired length.

Row 34 (top border): ch 3, (2 dc, ch 1) in end of row 33, (3 dc, ch 1) in end of each remaining row across top of shawl including the beginning loop. (102 dc)

Row 35 (bottom fringe-optional**): [ch 13, 5 sc in 2nd ch from hook, 5 sc in each of next 9 ch, ch 2] (one corkscrew made), sl st in next ch 2 sp, make corkscrew, sl st in same ch 2 sp, [make corkscrew, sl st in next ch 1 sp] across to last ch 1 sp before center ch 3 sp, make corkscrew, sl st in next ch 3 sp, make corkscrew, sl st in same ch 3 sp, [make corkscrew, sl st in next ch 1 sp] across to last ch 1 sp before laast ch 2 sp, make corkscrew, sl st in next ch 2 sp, make corkscrew, sl st in same ch 2 sp, make corkscrew, sl st in top of beg ch 3 of Row 34.

Fasten off, weave in ends

**Alternate fringe: If you prefer to use a plain fringe, (for each fringe) cut 3-5 pieces of yarn to twice the desired length and secure in ch 1 spaces with a larks head knit along bottom edge. This website has a good tutorial for making fringe in this manner.

Closeup of Row 34 (top edge)

Closeup of center

Closeup of corkscrew

One more for the road...


Pattern written by April Moreland
© 2010 All rights reserved

Solid Corner Half Square

Solid Corner Half Square

Finished Size: 5 inches X 6.5 inches on the diagonal side

Materials: Worsted Weight Yarn; US size "I" hook; Tapestry needle for weaving in ends.

ch 4

Round 1: (beg ch 3 counts as 1 dc) 7 dc in 4th ch from hook, turn.

Round 2: ch 3, 2 dc in same st, dc in each of next 2 sts, 5 dc in next st (corner made), dc in each of next 2 sts, 3 dc in

next st, turn.

Round 3: ch 3, 2 dc in same st, dc in each of next 6 sts, 5 dc in next st, dc in each of next 6 sts, 3 dc in next st, turn.

Round 4: ch 3, 2 dc in same st, dc in each of next 10 sts, 5 dc in next st, dc in each of next 10 sts, 3 dc in next st, turn.

*Note: For a larger square, continue in same manner making sure to increase 2 sts in the first and last st of each row and

to place corner in the center dc of corner from previous row.

Fasten off at end of last row, weave in ends.

Here it is laid on top of the solid square.

Pattern written by April Moreland
© 2010 All rights reserved

Solid Corner Square

Solid Corner Square

Finished Size: 5 inches

Materials: Worsted Weight Yarn; US size "I" hook; Tapestry needle for weaving in ends.

ch 4

Round 1: (beg ch 3 counts as 1 dc) 11 dc in 4th ch from hook, join with sl st in top of beg ch 3.

Round 2: ch 3, 5 dc in next st (corner made), [dc in each of next 2 sts, 5 dc in next st] 3 times, dc in next st, join with sl st in top of beg ch 3.

Round 3: ch 3, dc in each of next 2 sts, 5 dc in next st [dc in each of next 6 sts, 5 dc in next st] 3 times, dc in each of next 3 sts, join with sl st in top of beg ch 3.

Round 4: ch 3, dc in each of next 4 sts, 5 dc in next st [dc in each of next 10 sts, 5 dc in next st] 3 times, dc in each of next 5 sts, join with sl st in top of beg ch 3.

*Note: For a larger square, continue in same manner making sure to place corner in the center dc of corner from previous row.

Fasten off at end of last row, weave in ends.

Pattern written by April Moreland
© 2010 All rights reserved

Tuesday, March 30, 2010

I'm Done!

At long last the Calendar Ghan is finished!!


Now I just need to get the border instructions written up and we can call this one a done deal! WOOHOO! :)

Sunday, March 28, 2010

LYS Review

I'd never stepped foot in a LYS (local yarn store) before yesterday, not because I didn't want to, but because the opportunity had never presented itself. A New Yarn is a brand new LYS in Springfield, MO. I found them via their group on Ravelry earlier this month and knew I must visit!

WOW! is all I can say. I've heard so many LYS stories from different areas of the U.S. (both good and bad) that I really didn't know what to expect. Well there are no horror stories to be found here! I was greeted upon entering by an exceptionally friendly and helpful, but not at all overbearing, staff that obviously strives for a cozy atmousphere. I immediately felt at home.

I was on sensory overload as I perused the stunning displays of fibery goodness. The inventiveness and creativity that went into the displays is impressive. Of course there were the expected "cubbies" full of center pull skeins, and the "wall of hooks" displaying hanks ready to be wound, but what caught my eye was the display of Rowan Cotton seemingly tossed in an old washtub, the Crystal Palace Cotton Chenille arranged on an antique hutch, and even more yarn packed into a strategically opened drawer, all adding to the cozy, homey feeling.

Their spacious layout lends to the comfortable atmousphere. I could have easily strolled Ben around if necessary without feeling like the displays would come crashing down. I was in such awe of the yarn and displays that I almost didn't notice the comfy seating area. I could just picture a group of ladies sitting and talking about the week's events while knitting or crocheting. Such fun!

Much to my amazement, I only walked out with one skein of yarn. I bought a ball of Crystal Palace Yarn's Cotton Chenille in Bubblegum Pink. I've been wanting to play with this yarn ever since I saw the Reverse-Bloom Flower Washcloth in Weekend Knitting a few years ago. I have a few projects I need to wrap up, but I will definately be playing with the chenille soon!


I regret not planning my trip a little better. I really should have made a list of my current WIMs and the proposed fibers for those projects. I knew I needed some feltable wool but had not a clue as to my color needs. I stood there looking at their huge display of Cascade 220 feeling a bit overwhelmed. I know I could have asked for help, and it would have been given without hesitation, but with no idea of the direction I wanted to take with my color effect, it would have been frustrating for both of us. :(

The stress was all in my own head though. I felt rushed because I knew Cyndi and Ben were waiting anxiously in the car for me so we could grab some lunch. But even with feeling rushed, I had a blast petting all of the amazing yarn that I've only seen on the internet or in magazines.

Thank you A New Yarn for providing me with a wonderful shopping experience. The yarns are fabulous and the prices are easy on the wallet. I'm already planning my next shopping trip, and next time I will make sure I have plenty of time to explore!

If you're ever in the area, pay them a visit and tell them DishclothDiaries sent you! Even if you don't knit or crochet, it's definitely worth the trip just to see the colorful and inventive displays alone! :)

Thursday, March 25, 2010

Calendar Ghan Joining Instructions


**It was my original intention to do a photo tutorial of the joining method, but Ben decided to "play" with the camera so it is not operating to capacity at the moment(it won't focus properly) so doing a step by step photo tut was out of the question. I will get better pics of the finished ghan up ASAP. In the meanwhile, if you have any questions please leave a comment here. I will do my best to answer!


Materials: US size "I" hook, worsted weight yarn (Soft White was used for example), tapestry needle for weaving in ends

NOTES:
1: December's Mistletoe square has some ch 1 sps on the outermost row. When joining this square each ch 1 sp will count as one stitch.
2: Each of the Calendar 'Ghan squares have 37 stitches along each side PLUS the corner ch 2 sps. If the squares you are using do not have 37 sts you will need to do a row of sc around each square, increasing or decreasing as necessary to bring them all to the proper st count.
3: Alternately, these joining instructions may be used for any square so long as each side (not including the corner ch sp) has a stitch count that is a multiple of 3, + 1. Please note that you will need to adjust the number of repeats of the instructions in the brackets if using with a square other than one that has 37 sts on each side.

ABREVIATION NOTE:
S1 = Square 1 (you will only make one of these)
S2 = Square 2 (joined only on one side)
S3 = Square 3 (joined on two sides)
SA = Square A (when joining S1 and S2 this is the square facing you)
SB = Square B (when joining S1 and S2 this is the previously worked square behind SA)
SC = Square C (when joining S1 and S3 this is the next previously worked square behind SA)

*Use the Layout Chart below for square placement

Square 1: With right side facing, join yarn with sl st in any corner ch sp of square, (ch 3, dc, ch 3, 2 dc) in same sp, ch 1, skip next st, [dc in each of next 2 sts, ch 1, skip next st] 12 times, *(2 dc, ch 3, 2 dc) in next corner ch sp, ch 1, skip next st, [dc in each of next 2 sts, ch 1, skip next st] 12 times, rep from * twice more, join with sl st in top of beg ch 3, fasten off.

Square 2 (one sided join): With right side facing, join yarn with sl st in any corner ch sp of square, (ch 3, dc, ch 3, 2 dc) in same sp, ch 1, skip next st, [dc in each of next 2 sts, ch 1, skip next st] 12 times, (2 dc, ch 3, 2 dc) in next corner ch sp, ch 1, skip next st, [dc in each of next 2 sts, ch 1, skip next st] 12 times, (see abreviation note above) holding wrong sides together, on SA work 2 dc, ch 1 in next ch 2 sp, sl st in corner ch 3 sp on SB, ch 1, 2 dc in same ch 3 sp on SA, sl st in next ch 1 sp on SB, [(skip next st, dc in each of next 2 sts) on SA, sl st in next ch 1 sp on SB] 12 times, skip next st on SA, 2 dc in next corner ch sp on SA, sl st in corner ch 3 sp on SB, ch 1, 2 dc in same corner ch sp on SA, working on SA for remainder of square, ch 1, skip next st, [dc in each of next 2 sts, ch 1, skip next st] 12 times, join with sl st in top of beg ch 3, fasten off.

Square 3 (two sided join): With right side facing, join yarn with sl st in any corner ch sp of square, (ch 3, dc, ch 3, 2 dc) in same sp, ch 1, skip next st, [dc in each of next 2 sts, ch 1, skip next st] 12 times, (see abreviation note above) holding wrong sides together, on SA work 2 dc, ch 1 in next ch 2 sp, sl st in corner ch 3 sp on SB, ch 1, 2 dc in same ch 3 sp on SA, sl st in next ch 1 sp on SB, [(skip next st, dc in each of next 2 sts) on SA, sl st in next ch 1 sp on SB] 12 times, on SA work 2 dc, ch 1 in next ch 2 sp, sl st around joining slip st previously joined squares, ch 1, 2 dc in same ch 3 sp on SA, sl st in next ch 1 sp on SC, [(skip next st, dc in each of next 2 sts) on SA, sl st in next ch 1 sp on SC] 12 times, skip next st on SA, 2 dc in next corner ch sp on SA, sl st in corner ch 3 sp on SC, ch 1, 2 dc in same corner ch sp on SA, working on SA for remainder of square, ch 1, skip next st, [dc in each of next 2 sts, ch 1, skip next st] 12 times, join with sl st in top of beg ch 3, fasten off.


Square Layout Chart


Back to CAL Main Page

Pattern designed and written by April Moreland
© 2010 All rights reserved

Sunday, March 21, 2010

Coming Soon!

Many of you have been asking about the joining and border intructions for the Calendar Ghan. I know I've fallen to the wayside on this, but I just wanted to let you all know I haven't forgotten about it.

I haven't even put my own squares together yet. BUT I have put it on the agenda for this week and will be developing the details, with photos, and will have the joining instructions up later this week!