Sunday, December 5, 2010

Hook Roll Picture Tutorial

What's this? A sewing tutorial on The Left Side of Crochet?? Has she lost her mind?? Well not entirely, especially considering it is still crochet related!

I recently made a couple of hook rolls as gifts and thought I'd share with you here how I made them. Keep in mind I am NOT an expert sewer, so if I make a mistake or two I hope you'll forgive me. :)

SUPPLIES
You will need:
  • 1/3 yard each of 3 different coordinating cotton or flannel fabrics, OR 3 fat quarters
  • 1/3 yard of fusible interfacing for lightweight to medium fabrics (Not needed if you are using flannel or another heavy fabric for the public side of your hook case)
  • 2 yards of 3/8 inch satin ribbon
  • All purpose sewing thread in a coordinating color
  • Straight pins
  • Self healing cutting mat
  • See-through quilting ruler, 12 inches or longer
  • Rotary cutter
  • Scissors
  • Sewing machine
  • Ironing board/mat (or an old thick cotton towel)
  • Iron
  • Fray Check or Fabric Glue

CUTTING
Cutting Instructions:

**See How to Use a Rotary Cutter if you have never used a rotary cutter.
(OR you can simply use the scissors and a ruler to measure and cut out your fabric pieces.
)
  • Cut one 12" x 11" square from each piece of fabric for a total of three squares
  • Cut one 12" x 11" square from the piece of interfacing
  • Cut the ribbon to (approximately) 36"

DECISIONS
The Hard Part:

Deciding which fabric you want to use where! Designate which square you want to use for the Public Side, Lining/inside, and Pocket. Of course if you are using the same fabric for all 3 then it won't really matter and you can omit this step. :)


LAYERS

Public/Outer Layer:

Following the manufacturer's instructions, adhere the fusible interfacing (if using) to the wrong side of the fabric that you chose for the public side. (Mine called for using a damp cloth when ironing.)
Inside Hook Pocket:

Fold your pocket fabric in half lengthwise so that it is 5.5" x 12". Lay the lining fabric flat and right side up. Place the folded pocket piece on the lining piece matching the cut edges at the bottom. (The fold of the pocket piece will lie horizontally across the center of the lining fabric.)
Starting 2 inches in from each edge of the layered fabric and using straight pins (or Tailor's Chalk if you've got it... I didn't), mark the fabric at one inch intervals along the bottom edge and the top of the folded edge. You should have 9 pins along each edge. (I used a few extra at the corners just to keep everything in place.)


ASSEMBLY

The Good Part:
(Yay, we finally get to sew!)

Starting 2 inches from the edge and using the pins/marks as a guide, sew nine evenly spaced vertical lines across the bottom half of the fabric. Be sure to do a few back-stitches at the top (folded edge) of each line to lock the stitches and keep them from raveling.

Fold the ribbon in half and pin the folded end (with cut ends facing toward the center of the fabric) approximately 4 inches up from the bottom edge of the pocket fabric. Curl the ends around and pin to the center so they don't get caught in the stitching on the next step.
Matching long and short edges, place the pocket piece and the public/outer piece right sides together. Pin the pieces on all sides for sewing. (I was lazy and only pinned the corners.)
Starting at the bottom edge using a 1/2" seam allowance and leaving a 4 inch opening for turning, sew around all sides of the hook roll. Snip corners at an angle to within a scant 1/4" of the seam.


TURNING
We're Getting Close:

Turn the piece right side out. Using the tip of a (what else?) crochet hook, push out the corners from the inside so they are square and neat.

At the opening for turning, fold the seam allowance to the inside and press with iron. Press entire piece with iron to help all seams lay flat.

Dab a little Fray Check on the ends of the ribbon to keep them from fraying.


FINISHING

Top-stitching:

Working approximately 1/4" from edge of fabric, top-stitch around all sides of piece being sure to enclose the raw edges from the opening for turning.


Only Thing Left:

Is to Fill'er Up!

Fold down the top flap.

Roll it up, tie a pretty bow, and...

Ta-DAH!

Enjoy your new Hook Roll!

I hope you enjoyed this tutorial. I had a lot of fun making it. But don't worry, I haven't given up crochet! It's still my number one passion. :)


Tutorial written and photographed by April Moreland
© 2010 All rights reserved.
Please print and/or share this tutorial with your friends, but be sure to include the original link so that they (or you) will be able to find it again. :)

Saturday, December 4, 2010

Dressed for the Season

Happy December!

With the new season here I decided to change the background to match our weather here on the lake. It is cold and snowy and a bit icy today. Yuck! BUT, it is warm and cozy inside so that makes it perfect weather for staying home and doing lots of winter crocheting and crafting.

I have many things on my hook right now which I will be revealing to you over the next couple of weeks as they are received. (Don't want to spoil any surprises!)

And speaking of surprises, I have an unexpected one for you coming up in just a bit. I'll be putting the finishing touches on a brand new tutorial for you all and, if all goes well, will have it posted for you by tomorrow morning!

Hope you all are staying warm and enjoying the season with some crafty pleasures! :)

Thursday, November 25, 2010

Thank You

I just wanted to pop in and wish everyone a Happy Thanksgiving! As I've said before, this is my favorite time of year. For me, as I'm sure many of you, it evokes heart warming memories of family and friends who have touched us through the years, and reminds me of what is good in my life.

You, my friends, are special to me. You give me purpose to do what I love. Crochet! In appreciation for being there for me, I am sharing some special Thanksgiving dessert with you.


Enjoy!!

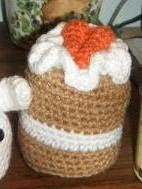
Carrot Cake

*Pattern has been clarified. If you find any other mistakes, please let me know. :)

Materials: (US) size F hook, worsted weight yarn: less than 1 ounce each of Warm Brown, and Soft White; scrap amounts of Carrot, and (optional)Paddy Green (Red Heart Super Saver was used for example), large handful of fiberfil stuffing, 2 small pieces of cardboard or plastic (I used circles cut from a plastic milk jug), tapestry needle.

NOTE: Entire piece is worked in the round without joining unless otherwise noted.

TOP

With Warm Brown and using adjustable loop

Round 1: 6 sc into loop. (6 sc)

Round 2: 2 sc in each st around. (12 sc)

Round 3: (2 sc in next st, sc in next st) 6 times. (18 sc)

Round 4: (2 sc in next st, sc in each of next 2 sts) 6 times. (24 sc)

Round 5: (2 sc in next st, sc in each of next 3 sts) 6 times. (30 sc)

Round 6: (2 sc in next st, sc in each of next 4 sts) 6 times. (36 sc)

Round 7: sc in each st around, sl st in next st to join, fasten off leaving long tail for sewing.

CAKE

With Warm Brown and using adjustable loop

Round 1: 6 sc into loop. (6 sc)

Round 2: 2 sc in each st around. (12 sc)

Round 3: (2 sc in next st, sc in next st) 6 times. (18 sc)

Round 4: (2 sc in next st, sc in each of next 2 sts) 6 times. (24 sc)

Round 5: (2 sc in next st, sc in each of next 3 sts) 6 times. (30 sc)

Round 6: (2 sc in next st, sc in each of next 4 sts) 6 times. (36 sc)

Round 7: sc in each st around.

Round 8: working in BLO, sc in each st around.

Rounds 9-11: sc in each st around.

Round 12: change to Soft White, sc in each st around.

Rounds 13 and 14: sc in each st around.

Round 15: Change to Warm Brown, sc in each st around.

Rounds 16 - 18: sc in each st around, at end of round 18 sl st in next st to join, fasten off, weave in ends.

ICING

With Soft White and using adjustable loop

Round 1: 6 sc into loop. (6 sc)

Round 2: 2 sc in each st around. (12 sc)

Round 3: (2 sc in next st, sc in next st) 6 times. (18 sc)

Round 4: (2 sc in next st, sc in each of next 2 sts) 6 times. (24 sc)

Round 5: (2 sc in next st, sc in each of next 3 sts) 6 times. (30 sc)

Round 6: 3 sc in each st around, sl st in next st to join, fasten off, weave in ends.

CARROTS (make 2)

With Carrot and using adjustable loop

Round 1: 8 sc into adjustable loop. (8 sc)

Round 2: sc in each st around.

Round 3: sc in each of next 6 sts, sc2tog. (7 sc)

Round 4: sc in each of next 5 sts, sc2tog. (6 sc)

Round 5: sc in each of next 4 sts, sc2tog. (5 sc)

Round 6: sc in each of next 3 sts, sc2tog. (4 sc)

Round 7: sc2tog, sc in next st, leave last st unworked, do not join, ch 1 and pull tight, fasten off leaving long tail for sewing. (2 sc)

ASSEMBLY

1) Optional: For tops of CARROTS, cut two 4 inch pieces of Paddy Green. Fold each piece in half and using a lark's head knot (fringe knot), attach 1 strand to each CARROT. Trim to desired length. Using tip of tapestry needle, split the plies of yarn to fray.

2) Arrange CARROTS as desired on top of ICING and using long tail, sew into place.

3) With Soft White, sew ICING piece to TOP piece between rounds 5 and 6.

4) Using the TOP piece as a template, cut 2 circles from the cardboard (or plastic) to fit just inside the CAKE piece. Place one of the circles in the bottom of the CAKE piece. Stuff with fiberfill. Place other circle on top of fiberfil.

5) Using the long tail left at the end of round 7, sew the outer edge of the TOP piece to the top edge of the CAKE piece.

Enjoy!

Sunday, November 21, 2010

DJ Ben Rock Is In Da House!


Anyone with a toddler running around should recognize this bright orange fellow from Nick Jr's Yo Gabba Gabba. Yes, Halloween has been over for 3 weeks, but I still wanted to post a picture of Ben's costume. Well, the hat to be exact.

The hat that came with the DJ Lance Rock costume didn't fit at all, not to mention is was a bit cheesy. So armed with a J Hook, a skein of RHSS in Pumpkin, and a ball of Orange Yarn Bee Haute Fur, I embarked on the mission of creating a proper fitting, and cooler looking, hat. I think I succeeded. :)


Stay tuned for the pattern in an upcoming blog post!

Wednesday, November 17, 2010

Apple Trivet


Finished size: Approximately 9 x 7 inches

Materials: (US) size G hook, Worsted Weight Cotton: 2 oz main color, scraps of green, and brown. (Example was made using Sugar‘n Cream in Red and Dk Pine, and I Love This Cotton in Brown), tapestry needle

Weave in ends as work progresses.

APPLE (make 2)

ch 6, join with sl st to form loop

Row 1: (ch 3, 2 dc, ch 1, 3 dc, ch 2, 3 dc, ch 1, 3 dc) in loop, turn.

Row 2: sl st in each of next 2 sts, sl st into next ch-1 sp, (ch 3, 2 dc, ch 1, 3 dc) in same sp, 6 dc in next ch-2 sp, (3 dc, ch 1, 3 dc) in next ch-1 sp, turn.

Row 3: sl st in each of next 2 sts, sl st into next ch-1 sp, (ch 3, 2 dc, ch 1, 3 dc) in same sp, ch 1, skip next 3 dc, 2 dc in each of next 6 sts, ch 1, (3 dc, ch 1, 3 dc) in next ch-1 sp, turn.

Row 4: sl st in each of next 2 sts, sl st into next ch-1 sp, (ch 3, 2 dc, ch 1, 3 dc) in same sp, ch 1, skip next 3 sts, (sc, ch 2) in each of next 11 sts, (sc, ch 1) in next st, (3 dc, ch 1, 3 dc) in next ch-1 sp, turn.

Row 5: sl st in each of next 2 sts, sl st into next ch-1 sp, (ch 3, 2 dc, ch 1, 3 dc) in same sp, ch 1, skip next 3 sts, (sc, ch 2) in each of next 10 ch-2 sps, (sc, ch 1) in next ch-2 sp, (3 dc, ch 1, 3 dc) in next ch-1 sp, turn.

Row 6: sl st in each of next 2 sts, sl st into next ch-1 sp, (ch 3, 2 dc, ch 1, 3 dc) in same sp, ch 1, skip next 3 sts, (sc, ch 2) in each of next 9 ch-2 sps, (sc, ch 1) in next ch-2 sp, (3 dc, ch 1, 3 dc) in next ch-1 sp, turn.

Row 7: sl st in each of next 2 sts, sl st into next ch-1 sp, (ch 3, 2 dc, ch 1, 3 dc) in same sp, ch 1, skip next 3 sts, (sc, ch 2) in each of next 8 ch-2 sps, (sc, ch 1) in next ch-2 sp, (3 dc, ch 1, 3 dc) in next ch-1 sp, turn.

Row 8: sl st in each of next 2 sts, sl st into next ch-1 sp, (ch 3, 2 dc, ch 1, 3 dc) in same sp, ch 1, skip next 3 sts, (sc, ch 2) in each of next 7 ch-2 sps, (sc, ch 1) in next ch-2 sp, (3 dc, ch 1, 3 dc) in next ch-1 sp, turn.

Row 9: sl st in each of next 2 sts, sl st into next ch-1 sp, (ch 3, 2 dc, ch 1, 3 dc) in same sp, ch 1, skip next 3 sts, (sc, ch 2) in each of next 6 ch-2 sps, (sc, ch 1) in next ch-2 sp, (3 dc, ch 1, 3 dc) in next ch-1 sp, turn.

Row 10: sl st in each of next 2 sts, sl st into next ch-1 sp, (ch 3, 2 dc, ch 1, 3 dc) in same sp, ch 1, skip next 3 sts, (sc, ch 2) in each of next 5 ch-2 sps, (sc, ch 1) in next ch-2 sp, (3 dc, ch 1, 3 dc) in next ch-1 sp, turn.

Row 11: sl st in each of next 2 sts, sl st into next ch-1 sp, (ch 3, 2 dc, ch 1, 3 dc) in same , ch 1, skip next 3 sts, (sc, ch 2) in each of next 4 ch-2 sps, (sc, ch 1) in next ch-2 sp, (3 dc, ch 1, 3 dc) in next ch-1 sp, turn.

Row 12: sl st in each of next 2 sts, sl st into next ch-1 sp, (ch 3, 2 dc, ch 1, 3 dc) in same ch sp, ch 1, skip next 3 sts, (sc, ch 2) in each of next 3 ch-2 sps, (sc, ch 1) in next ch-2 sp, (3 dc, ch 1, 3 dc) in next ch-1 sp, turn.

Row 13: sl st in each of next 2 sts, sl st into next ch-1 sp, (ch 3, 2 dc, ch 1, 3 dc) in same sp, ch 1, skip next 3 sts, (sc, ch 2) in each of next 2 ch-2 sps, (sc, ch 1) in next ch-2 sp, (3 dc, ch 1, 3 dc) in next ch-1 sp, turn.

Row 14: sl st in each of next 2 sts, sl st into next ch-1 sp, (ch 3, 2 dc, ch 1, 3 dc) in same ch sp, ch 1, skip next 3 sts, (sc, ch 2) in next ch-2 sp, (sc, ch 1) in next ch-2 sp, (3 dc, ch 1, 3 dc) in next ch-1 sp, turn.

Row 15: sl st in each of next 2 sts, sl st into next ch-1 sp, (ch 3, 2 dc, ch 1, 3 dc) in same sp, dc in next ch-2 sp, (3 dc, sl st in ch 1 sp of beg shell to join bottom, 3 dc) in next ch-1 sp, fasten off.

LEAVES (make 2)

ch 9

Row 1: sl st in 2nd ch from hook, hdc in next ch, dc in each of next 5 ch, (hdc, ch 1, sl st) in next ch, (working along opposite side of starting ch (ch 1, hdc) in first ch, dc in each of next 5 ch, hdc in next ch, sl st in next ch, fasten off.

STEM (hanging loop)

ch 8, join with sl st to form loop

Round 1: 12 sc in loop, fasten off.


ASSEMBLY

1. Using red yarn and holding the 2 apple pieces wrong sides together, sew around the outer edge to join.

2. Arrange leaves on front of trivet as desired (see photo for example) and sew into place one at a time using green yarn.

3. Sew stem/hanging loop into place at top of trivet (see photo for example) using red or brown yarn.

Ribbed Washcloth


Finished size: 7" Square

Materials:
(US) size 7 needles, 2 ounces Worsted Weight Cotton in desired color (Example was made using I Love This Cotton in the Carousel colorway)

Cast on 35.

Row 1: k3, (p1, k3) across. (35 sts)
Row 2: k1, (p1, k3) across to last 2 sts, p1, k1.
Rows 3 - 35: rep rows 1 and 2 ending with a row 1 rep.
Row 36: Bind off in pattern as established in row 2.

Finish off. Weave in ends. Block to 7" square.


Pattern designed and written by April Moreland
© 2010 All rights reserved

Monday, November 15, 2010

Share A Square

During my cyber travels this morning I came across the Share A Square blog. I had heard the name before but didn't know exactly what it was. After reading through the FAQs page this is definitely something I want to help out with. Like many of you I have a jam packed schedule through the holidays, but once my Christmas crocheting & sewing is completed I will be jumping on this project. I just thought I'd share the site with you here in hopes that you'll join me in helping this project meet its goal.

Sunday, November 14, 2010

Sweet & Simple Charity Scarf


MATERIALS: (US) size J hook, 1 skein Worsted Weight yarn (I Love This Yarn in the Sweet Mocha Multi colorway was used for example), tapestry needle

NOTE: BLO = back loop only

Ch 20

Row 1: dc in 4th ch from hook and in each ch across, turn. (18 dc)

Row 2: ch 3, working in BLO dc in next st and in each st across, turn.

Repeat row 2 (ending on an even row) until scarf is desired length or until skein is used up.  (I usually get somewhere around 80 rows)

Finish off. Weave in ends. Add fringe if desired.

Pattern designed and written by April Moreland
© 2010 All rights reserved

Tuesday, November 9, 2010

Odiferous Fiber

I've been seeing a lot of questions pop up on blogs and in groups around the net pertaining to foreign odors in yarn. Whether it's the result of a smoker, the family pet(s), or just plain funkitude (did I just invent a word?) it's something that needs to be dealt with.

First of all, consider the source of the smell. If it comes from smoke, or some other "additive," you are going to want to wash the yarn to remove any remaining residue. Of course you can just wash the yarn and be done with it all in one fell swoop, but it's probably easier to wash a finished item than it is a skein of yarn (plus a finished item will dry WAY faster than a skein of yarn!) Just food for thought.

Secondly, keep in mind that I am in no way an authority on the subject. I just thought I'd gather a few suggestions that I, and others, have found successful for removing those offensive smells.

> Erika over at Crochet by Day used some Febreeze and good ole fashioned sunshine to wipe out her "Yarn Funk".

> This idea is from me but inspired by Cyndi. Of course people have been using baking soda for years in the fridge for keeping odors at bay. Cyndi started sprinkling it on the carpet to avoid the unwanted odors that owning a dog can bring. She also uses it to remove foul odors from anything plastic. So I had the idea to place one of the fridge packs in with a box of offensive yarn. Leave it in the closed box overnight, or a couple of days for stronger smells, and you will have odor free yarn.

> And here is a discussion over on the 'ville regarding washing a whole skein yarn. It seems wrapping it up in a knee high stocking and letting it run through the machine is a go!

That's what I have for now. What have you used to remove unwanted odor from your yarn?

Wednesday, September 8, 2010

Last Slice of Summer

There is a relatively new forum over on Crochetville entitled "Giveaways" (you may need to be logged in to see it) in which I have been lurking here of late. It's a simple concept. A member posts an item that they've made to the forum and then chooses a fellow member to give it away to.

There are various methods for choosing a recipient. Some post pictures and then have people request to be added to the list, then they choose from the recipient from the compiled list. Others simply choose people at random to receive their lovely gifts.

Many of the "Giveawayers" make and offer an item each month. Usually the same item but in a different color or style. Tammy, of Coffee n' Crafts fame, has been offering a crocheted hook cake each month. Her cases are usually themed for the month, and are always super cute and awesome.

My favorite so far has been the *Summer Time Seeds* Hook Case. I had seen the post and knew I loved it and wished I could have it, but knew there were a LOT of people who felt the same way as I. So imagine my surprise when I saw that big puffy envelope with her return address on it!

Isn't it just AwEsOmE?!

And packed with extra goodies too!

THANK YOU Tammy!!! I love, love, love it!

:)

Wednesday, September 1, 2010

Algebraic Equation

Ben + Afghan ÷ Scissors = Sad MomMom3

I should know better than to turn my back on a 2 year old, even for a second, for I know terrible and destructive things can, and will, happen. I take full responsibility for it though. I should have put the scissors up.

I had been crocheting dilligently the night before. I was in the homestretch. I was almost finished the project. Nothing like this has happened before. He honestly thought he was helping. He started crying when I cried, the poor thing. I should have put those darn scissors up!

*sigh*

Since Ben's "surgery" on my latest project I've been in a crochet slump. I still haven't brought myself to attempt re-construction. I did, however, finally bring myself to inspect the damage. It won't be impossible to fix. It's an afghan done in strips. One of the strips is beyond repair, but the other 2 that were damaged shouldn't be too difficult to fix. whew

Tears were shed, lessons were learned (on both sides). The scissors are safely hidden away on the highest shelf, where they belong, safe from adventurous little fingers. :)

Saturday, August 28, 2010

Drop Dead Fred

My thumb is brown after all. :(

Whoever said you can't kill a succulent has never met me.

He was doing so well. I managed to keep him alive for 10 whole months with only minor mishap. He even had a little bud at the base of his stem. Life was good for Fred. But the move out here proved to be his demise. Well, not the move itself actually, it was me, I'm a horticultural murderess.

When we arrived in Ohio on Saturday afternoon 3 weeks ago all I wanted to do was escape from my cramped quarters in the backseat of Cyndi's Lancer. But in doing so, I left my healthy green companion sitting in the back window of the car, and thus subject to the heat of the car on a hot summer day. My absent mindedness cooked (literally) my poor little friend.

R.I.P. Fred, you will be missed :(

Thursday, August 19, 2010

Moving Vans, Beef Lo Mein, & Birthday Cake

The secret to staying young is to live honestly, eat slowly, and lie about your age. ~ Lucille Ball

There have been lots of happenings lately on the Left Side of Crochet. First of all, our stint in Missouri came to an abrupt end a few weeks ago. To quote Popeye, "That's all [we] can stands, and [we] can't stands no more."

In short, the economy got the better of us.

So we packed up our gear, (including over 20 boxes of yarn!) and started heading East. We came to rest in a quaint little town in NE Ohio situated right on Lake Erie. It has that perfect little hometown feel. Not too slow as to be boring, but not too bustling as to feel frenzied.

It wasn't a random pick. We chose the area, #1, because it's a factory town with plenty of jobs for the taking, and #2 (and most importantly), because it is where my youngest daughter lives.

It's so incredibly good to have the family together again!

And just in time for my special day...


Monday, July 5, 2010

Surf & Turf


Chain a multiple of 15 + 2

Row 1: dc in 4th ch from hook, dc in each of next 2 ch, *[skip next 3 ch, (4 dc, ch 1, 4 dc) in next ch (shell made), skip next 3 ch], dc in each of next 8 ch, rep from * across to last 11 ch, rep between [ ] once more, dc in last 4 ch, ch 3, turn.

Row 2: dc in each of next 3 sts, *[ch 3, skip next 4 sts, sc in next ch 1 sp, ch 3, skip next 4 sts], dc in each of next 8 sts, rep from * across to last shell, rep between [ ] once more, dc in last 4 sts, ch 3, turn.

Row 3: dc in each of next 3 sts, *[skip next ch 3 sp, (4 dc, ch 1, 4 dc) in next st, skip next ch 3 sp], dc in each of next 8 sts, rep from * across to last shell, rep between [ ] once more, dc in last 4 sts, ch 3, turn.

Row 4: dc in each of next 3 sts, *[ch 3, skip next 4 sts, sc in next ch 1 sp, ch 3, skip next 4 sts], dc in each of next 8 sts, rep from * across to last shell, rep between [ ] once more, dc in last 4 sts, ch 3, turn.

Repeat rows 3 and 4 to desired size.


You can see my previous blog post about this stitch pattern here.

Sunday, July 4, 2010

Majesty Square


Finished Size: 12 inches square

Materials: Worsted Weight Yarn: approximately 2 ounces in each color A, and color B*; US size "H" hook; tapestry needle for weaving in ends.

*In example shown Red Heart Super Saver in Lavender was used for color A, and Red Heart Super Saver in Soft White was used for color B


With color A ch 5, sl st in 5th ch from hook to form loop

Round 1: ch 3, [2 dc, ch 2, (3 dc, ch 2) 3 times] in loop, join with sl st in top of beg ch 3.

Round 2: ch 3, dc in each of next 2 sts, *ch 2, sc in next ch 2 sp, ch 2, dc in each of next 3 sts, rep from * twice more, ch 2, sc in next ch 2 sp, ch 2, join with sl st in top of beg ch 3.

Round 3: ch 2, dc next 2 sts together, *ch 3, skip next ch 2 sp, (sc, ch 3, sc) in next sc, ch 3, skip next ch 2 sp, dc next 3 sts together (cluster made), rep from * twice more, ch 3, skip next ch 2 sp, (sc, ch 3, sc) in next sc, ch 3, skip next ch 2 sp, skip beg ch 2, sl st in top of next st to join, fasten off.

Round 4: Skip next ch 3 sp, join color B with sc in next ch 3 sp, *ch 2, skip next ch 3 sp, (4 dc, ch 2, 4 dc) in next st, ch 2, skip next ch 3 sp, sc in next ch 3 sp, rep from * twice more, ch 2, skip next ch 3 sp, (4 dc, ch 2, 4 dc) in next st, ch 2, skip next ch 3 sp, join with sl st in beg sc.

Round 5: ch 3, *2 dc in next ch 2 sp, dc in each of next 4 sts, (2 dc, ch 2, 2 dc) in next ch 2 sp, dc in each of next 4 sts, 2 dc in next ch 2 sp, dc in next st, rep from * twice more, 2 dc in next ch 2 sp, dc in each of next 4 sts, (2 dc, ch 2, 2 dc) in next ch 2 sp, dc in each of next 4 sts, 2 dc in next ch 2 sp, join with sl st in top of beg ch 3, fasten off.

Round 6: Join color A with sl st in any ch 2 sp, ch 3, (dc, ch 2, 2 dc) in same sp, *(ch 1, skip next st, dc in each of next 2 sts) twice, ch 1, skip next st, dc in each of next 3 sts, (ch 1, skip next st, dc in each of next 2 sts) twice, ch 1, skip next st**, (2 dc, ch 2, 2 dc) in next ch 2 sp, rep from * three times more ending last repeat at **, join with sl st in top of beg ch 3.

Round 7: ch 3, dc in next st, *(2 dc, ch 2, 2 dc) in next ch 2 sp, (dc in each of next 2 sts, ch 1, skip next ch 1 sp) three times, dc in each of next 3 sts**, (ch 1, skip next ch 1 sp, dc in each of next 2 sts) three times, rep from * three times more ending last repeat at **, (ch 1, skip next ch 1 sp, dc in each of next 2 sts) twice, ch 1, skip next ch 1 sp, join with sl st in top of beg ch 3, fasten off.

Round 8: Join color B with sl st in any ch 2 sp, ch 3, (dc, ch 2, 2 dc) in same sp, *dc in each of next 4 sts, dc in next ch 1 sp, (dc in each of next 2 sts, dc in next ch 1 sp) twice, dc in each of next 3 sts, dc in next ch 1 sp, (dc in each of next 2 sts, dc in next ch 1 sp) twice, dc in each of next 4 sts**, (2 dc, ch 2, 2 dc) in next ch 2 sp, rep from * three times more ending last repeat at **, join with sl st in top of beg ch 3, fasten off.

Round 9: Join color A with sl st in any ch 2 sp, ch 3, (dc, ch 2, 2 dc) in same sp, *(ch 1, skip next st, dc in each of next 2 sts) four times, ch 1, skip next st, dc in each of next 3 sts, (ch 1, skip next st, dc in each of next 2 sts) four times, ch 1, skip next st**, (2 dc, ch 2, 2 dc) in next ch 2 sp, rep from * three times more ending last repeat at **, join with sl st in top of beg ch 3.

Round 10: ch 3, dc in next st, *(2 dc, ch 2, 2 dc) in next ch 2 sp, (dc in each of next 2 sts, ch 1, skip next ch 1 sp) five times, dc in each of next 3 sts**, (ch 1, skip next ch 1 sp, dc in each of next 2 sts) five times, rep from * three times more ending last repeat at **, (ch 1, skip next ch 1 sp, dc in each of next 2 sts) four times, ch 1, skip next ch 1 sp, join with sl st in top of beg ch 3, fasten off.


Pattern designed and written by April Moreland
© 2010 All rights reserved

Wednesday, June 30, 2010

Sunday, June 20, 2010

New Blog

I've been dealing with some personal issues of late. I started a blog to help me sort out my emotions and help myself get well again. It will be mostly short essays, healthful tips, and the occasional bit of crochet as it relates to the subject matter. It is called Confessions of an Overweight Hooker. The link is http://fathooker.blogspot.com/ if you'd like to check it out.

Thursday, June 10, 2010

2-D Butterfly


In honor of the 1.5 million children who perished in the Holocaust
Read more about The Butterfly Project


Materials: any weight yarn or thread (scrap amount in main color, 10 inch piece in contrasting color), hook size appropriate for yarn/thread used, tapestry needle for weaving in ends, fabric stiffener (optional)

Finished Size
Thread (shown above) with (US) size 7 steel hook: 2.5 inches x 1.75 inches (blocked)
Sport (3) with (US) size D hook: 3 inches x 2.25 inches (unblocked)
Worsted (4) with (US) size H hook: 4.75 inches x 3.5 inches (unblocked)

Special Stitches:
Picot: ch 3, sl st in 3rd ch from hook

ch 5, join with sl st in 5th ch from hook to form loop

Row 1: ch 3, dc in loop, [ch 1, 2 dc in loop] 5 times, turn. (12 dc)

Row 2: 5 dc in next ch 1 sp (shell made), shell in next ch 1 sp, sc in next ch 1 sp, shell in each of next 2 ch 1 sp, sl st in top of beg ch 3 from previous row, ch 1, turn. (4 shells)

Row 3: {dc, in next st, 2 tr in next st, (tr, picot, tr) in next st, 2 tr in next st, dc in next st} (upper wing made), sl st in sp between shells, [dc in next st, 2 dc in next st, (dc, picot, dc) in next st, 2 dc in next st, dc in next st] (lower wing made), sl st in next sc, rep between [ ] for second lower wing, sl st in sp between shells, rep between { } for second upper wing, sl st in same st as last dc made. Fasten off, weave in ends.

FINISHING

1. Measure the center most portion of your butterfly from top to bottom (where the body would normally be on a butterfly. See Fig 1.) Fold contrasting color yarn or thread in half. Wrap folded yarn around center of butterfly from back to front. (see Fig 2) Tie an overhand knot close to top of butterfly as indicated in Fig 3.

2. Making sure not to twist the loop, place the folded piece around the center of the body and pull knot through the loop. (see Fig. 4) Trim antennae to desired length.

3. Stiffen as desired.


Fig. 1


Fig. 2


Fig. 3


Fig. 4


Made with Worsted Weight (4)

Made with Sport/Baby Weight (3)
Pattern designed and written by April Moreland
© 2010 All rights reserved

Sunday, May 16, 2010

A Day at the Fair

Cyndi, Ben, and I spent this past Saturday splashing in the mud and playing with fiber! We visited the HFA Fiber Fair 2010 in Marshfield, Mo. It rained off and on most of the day but everything was in the pavilions so we stayed dry (for the most part) and had a blast! :)

We weren't there but about 3 or 4 minutes when a woman handed me a card and said, "You've won a door prize!" It was a lovely assortment of Goat's Milk bath products in a basket shaped like the state of Missouri, provided by Misty Woods ~ Home, Health, and Goat's Milk Products.


Next it was off to look at the craft tables and all the fiber goodies. There were so many gorgeous handmade items. And the yarns were so much fun to look at. I bought some hand dyed wool for Cyndi to play with:


And I got myself some pencil roving so I can try my hand at Kool-Aid dying and needle-felting:


Oh, and we picked up a couple of hot chicks too! (Pot holders) LOL


But the real reason we were there, at least as far as Ben was concerned, was to look at all the animals:

Little Lambs


Alpacas


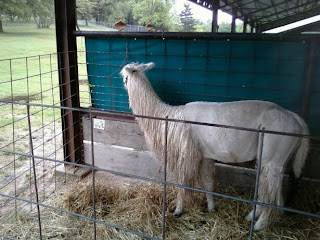
Alpaca after shearing


And the most impressive: A lady spinning angora directly from the bunny while he's sitting on her lap. Sorry for the dark picture... the lighting was bad for that one. :(


After the fair we went up to Springfield to visit A New Yarn (my favorite LYS!) where I bought some Noro Silk Garden to make myself a new bag. :)


Well, we were exhausted when we got home but it was totally worth it! We will definitely be going to the fair again next year! :)